
Pete's Camaro

Re: Pete's Camaro
If you can put up with Mike Brewer for more than 5 minutes at a time, there's a 68 Camaro on Wheeler Dealers on Discovery ATM.

-
pjs65
- Posts: 442
- Joined: Sat Oct 10, 2009 7:08 pm
- Location: recovering from a My Bloody Valentine gig
Re: Pete's Camaro
I did get to watch it because my missus made me , i was trying to eat my tea at the time and i didn't want that Brewer bloke to put me off .maff wrote:If you can put up with Mike Brewer for more than 5 minutes at a time, there's a 68 Camaro on Wheeler Dealers on Discovery ATM.
The weather has been too nice for me to want to spend time in the garage so progress has been slow . I have fitted the electric fuel pump and welded a mini sump to the petrol tank , i though i would try the sump with a baffle first and hopefully i shouldn't need a surge tank .

cut a hole in the tank a made a mini sump with a circular baffle around the inlet and outlet and welded that on , the fittings enable me to use 12mm pipe which should be more than enough . Iam going to use a return feed setup instead of a deadhead one so i used the old 10 pipe as a return feed line , having the fuel circulating all the time should keep it cooler that way .

Here it is back on the car with the pump and filter , i have put in a 100 micron filter before the pump and i will use a 20 micro filter at the other end before the regulator .

I have paided i bit more attention to the wiring than i normally do as i want to do it properly , i should do a better job of it than i usually do but iam to lazy to and one day its going to cost me . So i bought some cable conduit and have been putting the wires into that and also fixing it all with clamps , i want it to be neat instead of my usual birds nest .

The engine parts i want aren't available till next month so i have the exciting job of changing the front ball joints trying to sort out the front end wiring which is a right mess , i plan to make up separate fuse and relay panel for that . Pete
-
jap.slapper

- Posts: 985
- Joined: Wed Jul 14, 2010 4:55 pm
- Location: On top of my Welsh mountain
Re: Pete's Camaro
Fantastic work there mate

Re: Pete's Camaro
Brillant idea with the fuel tank, i'll be very interested to see how well that works 
-
Monster

- Posts: 1150
- Joined: Fri Jun 20, 2008 11:35 am
- Location: In the pub, err, I mean working late....
Re: Pete's Camaro
As said, great work there Pete. Do you have a completion date that you're aiming for or are you palying it by ear?
-
pjs65
- Posts: 442
- Joined: Sat Oct 10, 2009 7:08 pm
- Location: recovering from a My Bloody Valentine gig
Re: Pete's Camaro
Well i would like it done by July as its MOT is up then ,although i haven't ordered the rest of the engine bits yet . Just finishing off some suspension work and why i got a yank v8 then spend more time faffing around with the suspension i don't know , i should have bought a Caterham .There is also the problem of what wheels to use/get but that will be a last minute thing and finally redo the front end electrics , so i really need to muster a bit of urgency . PeteMonster wrote:As said, great work there Pete. Do you have a completion date that you're aiming for or are you palying it by ear?

Re: Pete's Camaro
Pete, awesome job, you really do amaze me at the level of work you do!.
-
pjs65
- Posts: 442
- Joined: Sat Oct 10, 2009 7:08 pm
- Location: recovering from a My Bloody Valentine gig
Re: Pete's Camaro
Cheers Ben and its actually being on the Bigpower site and seeing the standard of other peoples cars that sort of makes you want to do it to the same level . Just having a quick look at the cars on here like Jaffa the various RX7s APT cars and loads more i could go on where the standard of work is obvious .I like to have confidence in the car and feel safe using it and not to breakdown through shoddy work or embarrassed at some dodgy wiring hanging from the dash . I have been looking at your Scooby thread and thats a nice tidy car ,i want to get mine back on the road and i will put some pictures on when i get time . PeteBen wrote:Pete, awesome job, you really do amaze me at the level of work you do!.
-
pjs65
- Posts: 442
- Joined: Sat Oct 10, 2009 7:08 pm
- Location: recovering from a My Bloody Valentine gig
Re: Pete's Camaro
I have been tinkering with the front suspension geometry again in an effort to make it work better . I have probably said before that the settings from the factory are pants and it doesn't generate a lot of negative camber . It can be adjusted a bit and made to work better on the road but for track use its needs some more involved work , as a note iam doing this because i refuse to pay 10k for a Corvette based front suspension .
One of the first things i did was to redrill the upper control arm mounts further down and a bit rearwards ,this is a common mod that was used in the 60s. It adds a touch more castor and increases negative camber gain in compression , this pulls the top of the outside wheel in when cornering to reduce understeer .The holes arrowed are the old ones and the new ones which have the bolts in are moved quite a bit.

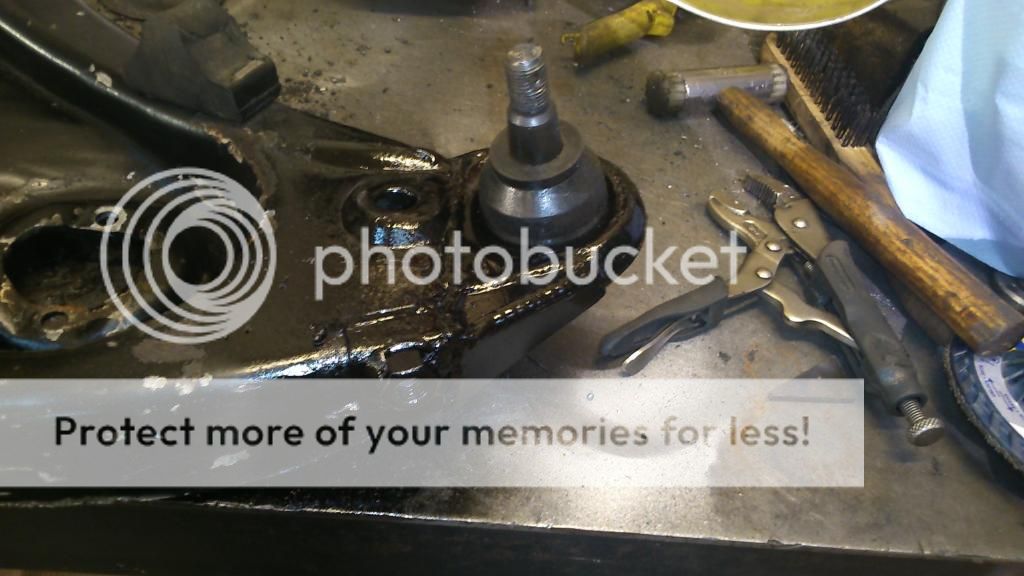
I have adjusted the upper A arm using shims to about as far as they will go , i can get up to 3.5 - camber but only 3to4 deg extra caster . The factory set for castor is actually 0 so i want it to be at 5 and start from there . The other problem with adjusting the A arm to far for the castor is that it pushes the wheel back into the inner arch . So what i have done is the move the lower ball joint further forward by cutting its mount off and rewelding it further forward as indicated by the arrows , there is more space to push the bottom one foward than the top back .
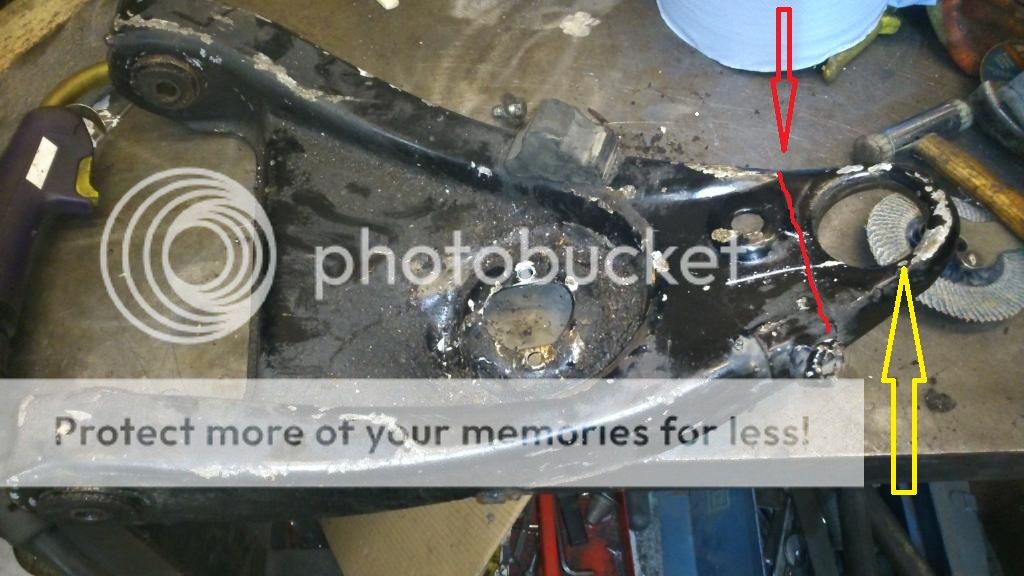
I have moved the mount 20mm fowards which is about 5 deg in extra castor angle .
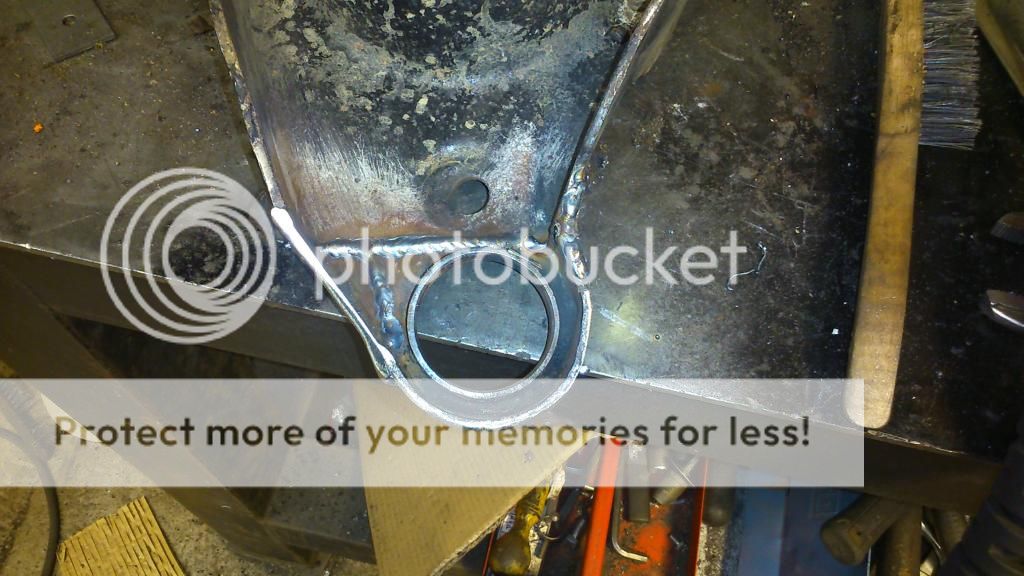
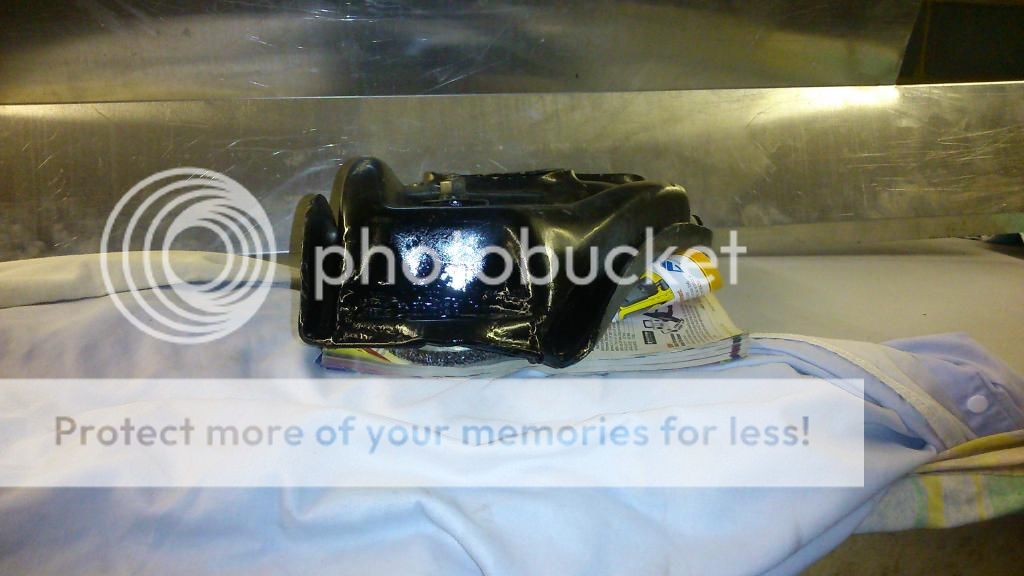
Then welded it fully add gave it then usual blow over with a can of black paint
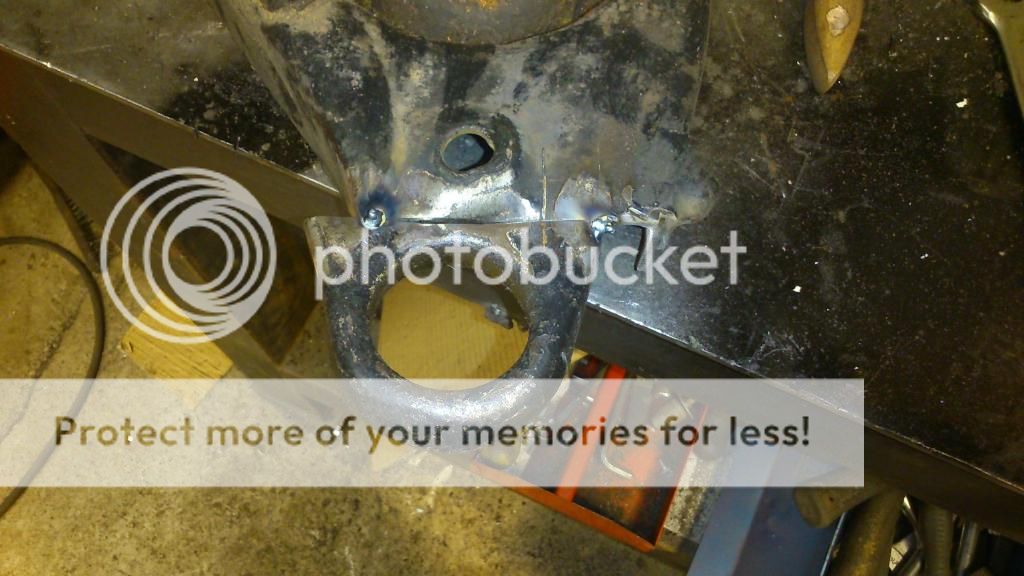
This seemed to work great when i refitted the arms and with some steering lock the wheel gained some negative camber . the only problem was that the upper ball joints started to bind with the extra angle , so they had to be cut and rewelded .
As you can see the upper ball joint mount is angled reawards as it is so more angle on the joint means it binds

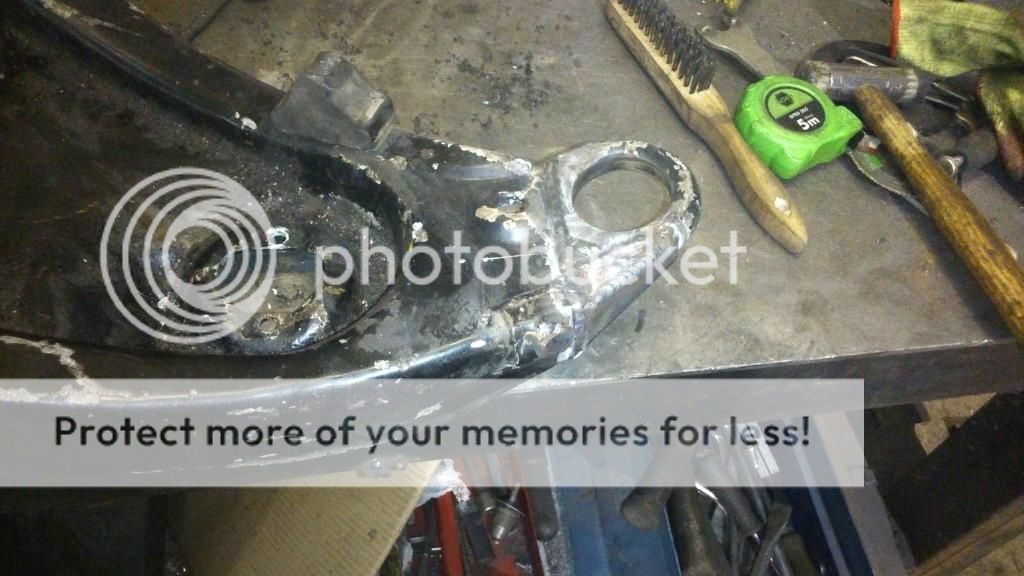
This is after i reworked it and the mounting surface is now level and the ball joint has more travel , not that clear on the picture ,
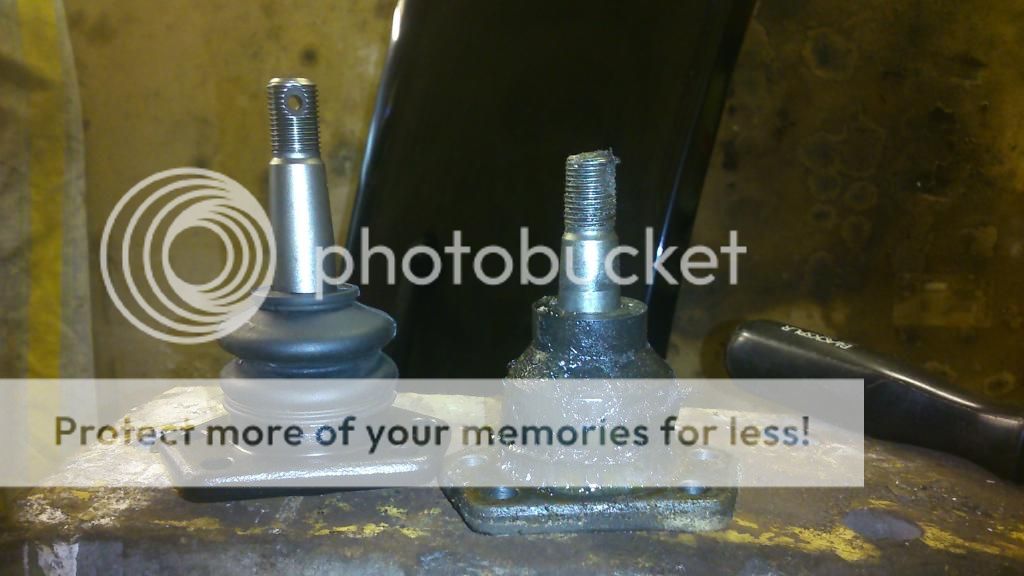
I have also added some taller upper ball joints because this helps the suspension gain negative camber
The idea behind all this is to remove some of the static 3.5 deg of negative camber i have and try to use the extra castor and upper arm mods to get it back dynamically . I know what iam after just having trouble explaining it and its long winded but its kept me
occupied with research and fabricating for a few weeks . I need the engine back in and some weight on the front end to show the effects on the suspension at its proper height , so thats something to look forward to . Pete
One of the first things i did was to redrill the upper control arm mounts further down and a bit rearwards ,this is a common mod that was used in the 60s. It adds a touch more castor and increases negative camber gain in compression , this pulls the top of the outside wheel in when cornering to reduce understeer .The holes arrowed are the old ones and the new ones which have the bolts in are moved quite a bit.

I have adjusted the upper A arm using shims to about as far as they will go , i can get up to 3.5 - camber but only 3to4 deg extra caster . The factory set for castor is actually 0 so i want it to be at 5 and start from there . The other problem with adjusting the A arm to far for the castor is that it pushes the wheel back into the inner arch . So what i have done is the move the lower ball joint further forward by cutting its mount off and rewelding it further forward as indicated by the arrows , there is more space to push the bottom one foward than the top back .

I have moved the mount 20mm fowards which is about 5 deg in extra castor angle .

Then welded it fully add gave it then usual blow over with a can of black paint


This seemed to work great when i refitted the arms and with some steering lock the wheel gained some negative camber . the only problem was that the upper ball joints started to bind with the extra angle , so they had to be cut and rewelded .
As you can see the upper ball joint mount is angled reawards as it is so more angle on the joint means it binds

This is after i reworked it and the mounting surface is now level and the ball joint has more travel , not that clear on the picture ,

I have also added some taller upper ball joints because this helps the suspension gain negative camber

The idea behind all this is to remove some of the static 3.5 deg of negative camber i have and try to use the extra castor and upper arm mods to get it back dynamically . I know what iam after just having trouble explaining it and its long winded but its kept me
occupied with research and fabricating for a few weeks . I need the engine back in and some weight on the front end to show the effects on the suspension at its proper height , so thats something to look forward to . Pete
Re: Pete's Camaro
You really are re-engineering this car. I so need to pick your brains