
My RS Turbo - Plenum project (+ MORE!)

-
Christian and Beccy
- Posts: 344
- Joined: Thu Oct 05, 2006 10:52 pm
- Location: Norwich

-
Christian and Beccy
- Posts: 344
- Joined: Thu Oct 05, 2006 10:52 pm
- Location: Norwich
Long overdue update. Please forgive the direct Cut/Paste from Passionford.
Well, it's me! Just thought I'd update my thread with my lifes work! LOL.
Having run the plenum as seen on earlier pages and deciding that I want to keep with it, I set about improving the design and making it more 'proper'. However, this did entail more work than I ever imagined!
This involved removing the Throttle Body mounting flange and the Head flange and basically starting again.
All work seen here was to my design and after having a few failed attempts at getting it just so. The actual machining and welding was carried out by DC Developments, who have been SO helpful with so many aspects of the work on my car. Thanks Matt!
Anyway, I have done away with the original injector mounting flange and opted for one that is built into the plenum itself. I am using a different fuel rail with AN adaptors on the ends, ready to take Aeroquip style connectors.


However, of course it needs to carry the waterways down to the oil modine. This was taken care of by making the flange quite thick and having a waterway machined into it. This waterway also has a mount for the water temperature sensor in it. I have begun to port match this flange to the rest of the plenum, but this is yet to be completed, as you can see.

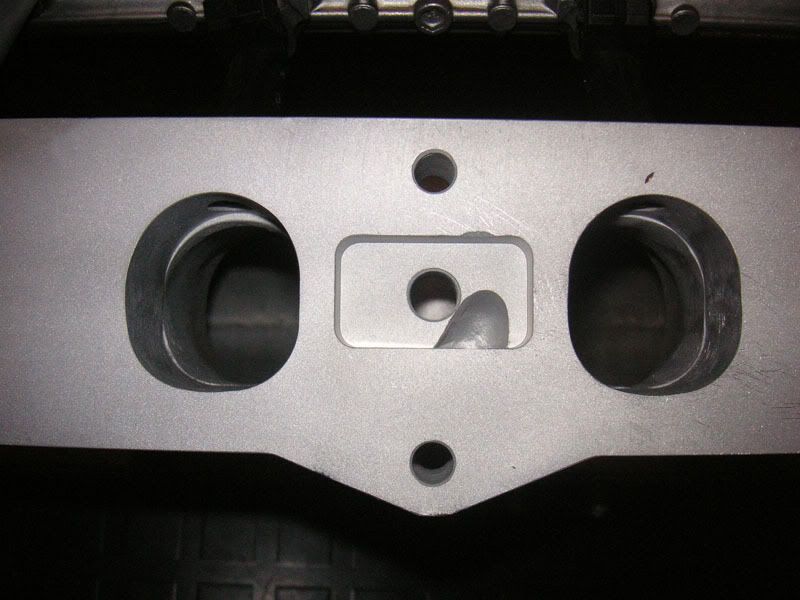
Next up was to throw the Cossie throttle body away and get something a bit nicer. I went for a Skunk2 Billet Alloy one. The main reason for this is that there aren't many nice throttle bodies on the market that are small enough! I didn't want anything huge and its a struggle to get something like this under 80mm, which is of course massively too big for a l'il RST! The flange has again been made thick because the inside face of it is profiled to aid airflow to the trumpets, particularly the closest one. Excuse the bolts, of course they are temporary!

This throttle body is fantastic in the sense that it allows the map sensor to be mounted directly on it, removing the need for a vacuum connection and pipework for it. I also had DC Developments add mounting bosses for the Throttle Cable bracket, which I am yet to make.

I have also had four -3 male connectors added. These will be used for the Fuel pressure regulator and wastgate. There will be a special adaptor made also for connection to the map sensor on the dyno, as this usually uses a push-on hose. This will leave 1 spare at this stage, which will be blanked off with a proper blanking cap. Hopefully gone are the days of vacuum system leaks! There is also a threaded boss there for use as an air by-pass should I need an idle valve, but since swapping to the new ECU, I haven't had one yet.
I hope you like it. You're seeing it here in its raw bead-blasted state, I haven't yet decided what colour it will end up. :-D
Well, it's me! Just thought I'd update my thread with my lifes work! LOL.
Having run the plenum as seen on earlier pages and deciding that I want to keep with it, I set about improving the design and making it more 'proper'. However, this did entail more work than I ever imagined!
This involved removing the Throttle Body mounting flange and the Head flange and basically starting again.
All work seen here was to my design and after having a few failed attempts at getting it just so. The actual machining and welding was carried out by DC Developments, who have been SO helpful with so many aspects of the work on my car. Thanks Matt!
Anyway, I have done away with the original injector mounting flange and opted for one that is built into the plenum itself. I am using a different fuel rail with AN adaptors on the ends, ready to take Aeroquip style connectors.
However, of course it needs to carry the waterways down to the oil modine. This was taken care of by making the flange quite thick and having a waterway machined into it. This waterway also has a mount for the water temperature sensor in it. I have begun to port match this flange to the rest of the plenum, but this is yet to be completed, as you can see.
Next up was to throw the Cossie throttle body away and get something a bit nicer. I went for a Skunk2 Billet Alloy one. The main reason for this is that there aren't many nice throttle bodies on the market that are small enough! I didn't want anything huge and its a struggle to get something like this under 80mm, which is of course massively too big for a l'il RST! The flange has again been made thick because the inside face of it is profiled to aid airflow to the trumpets, particularly the closest one. Excuse the bolts, of course they are temporary!
This throttle body is fantastic in the sense that it allows the map sensor to be mounted directly on it, removing the need for a vacuum connection and pipework for it. I also had DC Developments add mounting bosses for the Throttle Cable bracket, which I am yet to make.
I have also had four -3 male connectors added. These will be used for the Fuel pressure regulator and wastgate. There will be a special adaptor made also for connection to the map sensor on the dyno, as this usually uses a push-on hose. This will leave 1 spare at this stage, which will be blanked off with a proper blanking cap. Hopefully gone are the days of vacuum system leaks! There is also a threaded boss there for use as an air by-pass should I need an idle valve, but since swapping to the new ECU, I haven't had one yet.
I hope you like it. You're seeing it here in its raw bead-blasted state, I haven't yet decided what colour it will end up. :-D

 .
. -
Christian and Beccy
- Posts: 344
- Joined: Thu Oct 05, 2006 10:52 pm
- Location: Norwich
