
Spent some time sorting out the wheel alignment now the top mounts, Lower ball joints and wheel bearings have all been replaced.
I used what is known as the `string` method, its surprisingly accurate..
First, I started with a roll of SEA FISHING SHOCK LEADER, its strong fishing line, I bought 50m in Fluorescent Red off Ebay for
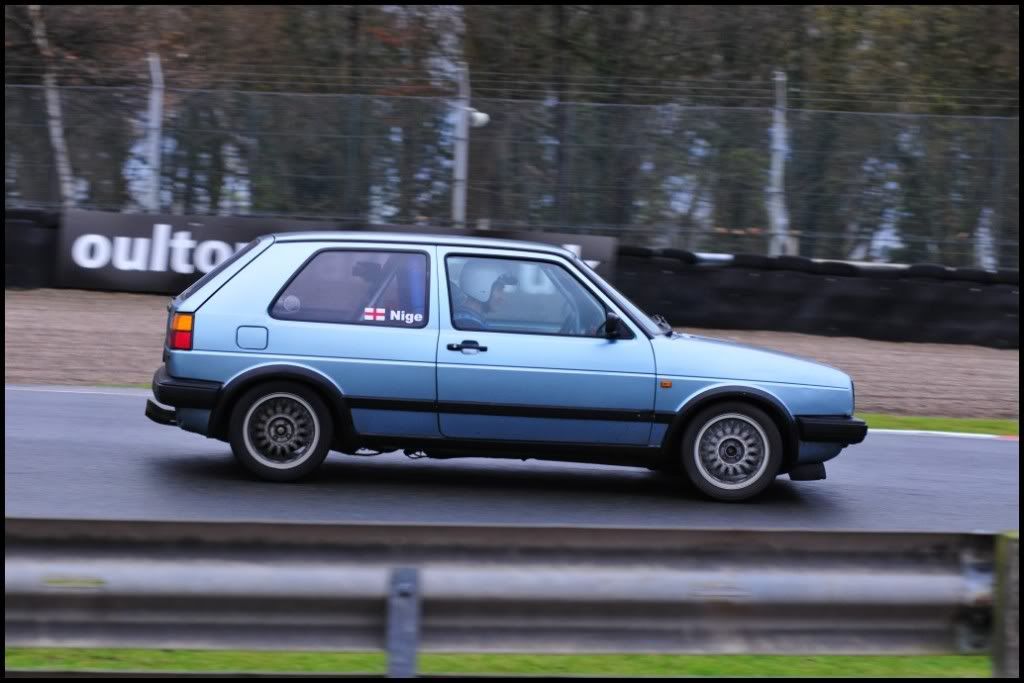
Niges MK2 Golf Track car build in 5 weeks.. MASSIVE Thread !
Next step was Camber Adjustment.
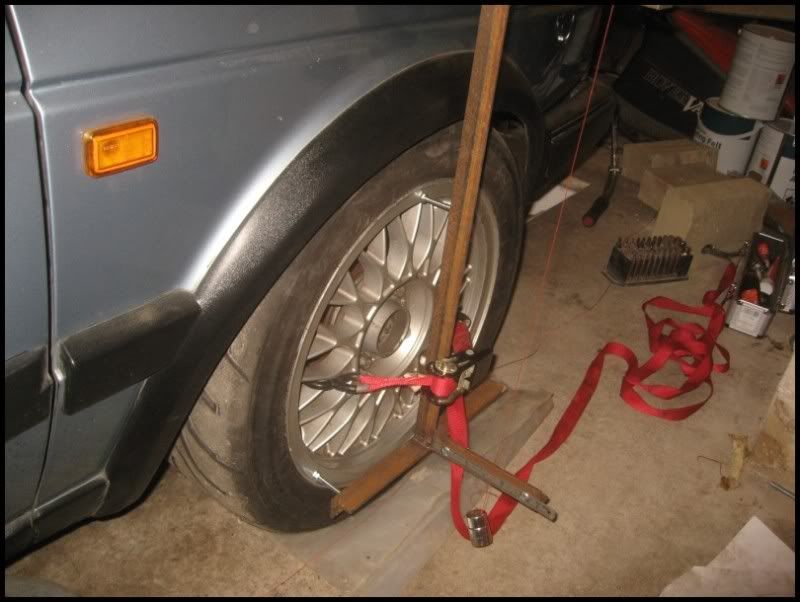
As I didn`t own a camber gauge, I decided to make one. I`ve read loads of text guides, but no comprehensive photo guide, so I thought I`d make one
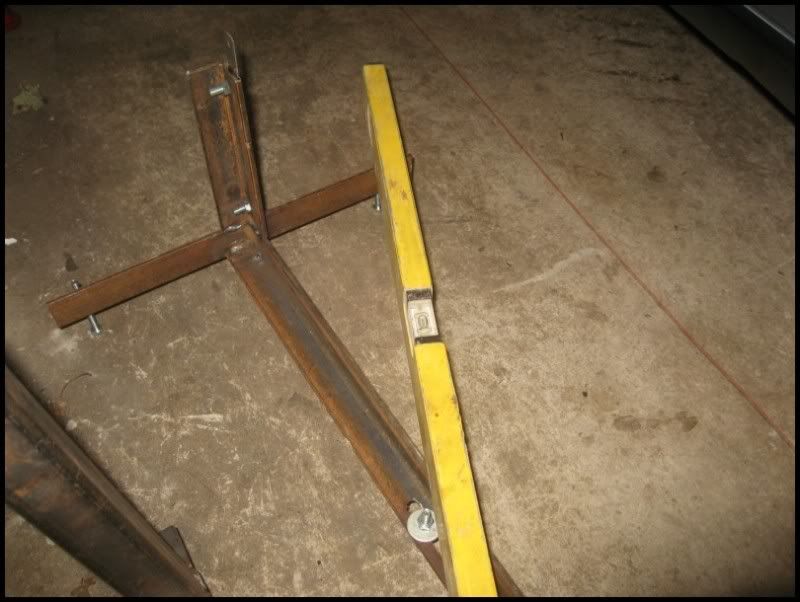
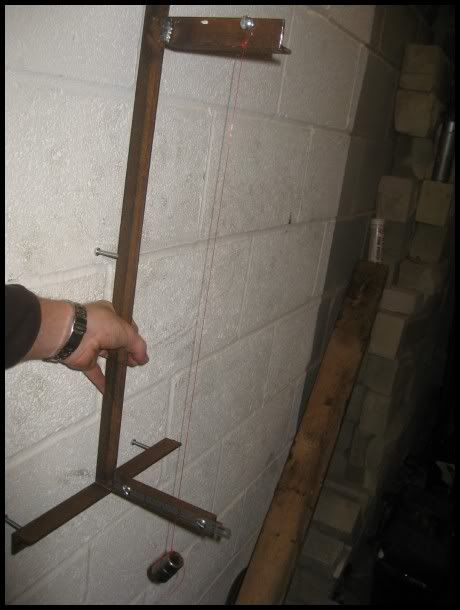
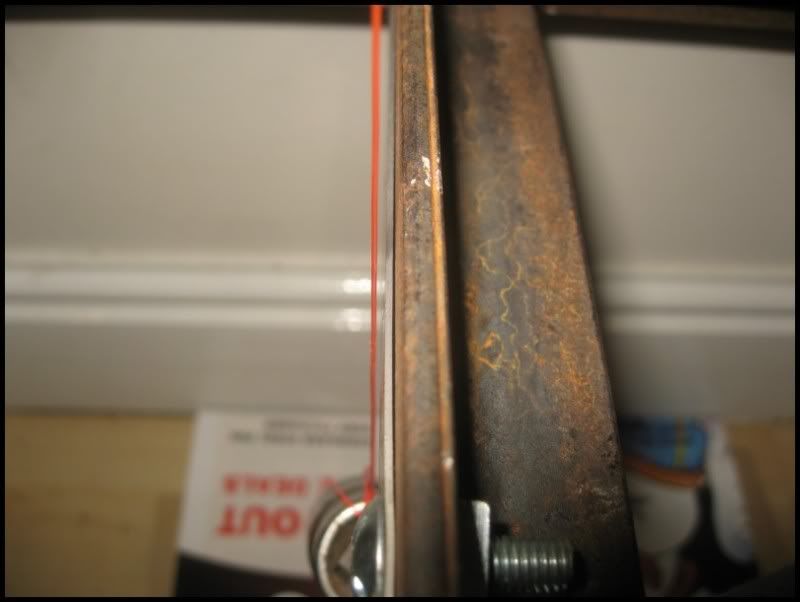
I used 30mm Steel Angle as I had several bits laying around. I wanted to be able to use the gauge on varying sized wheels, so I cut a slot into the angle with a 1mm slitting disk
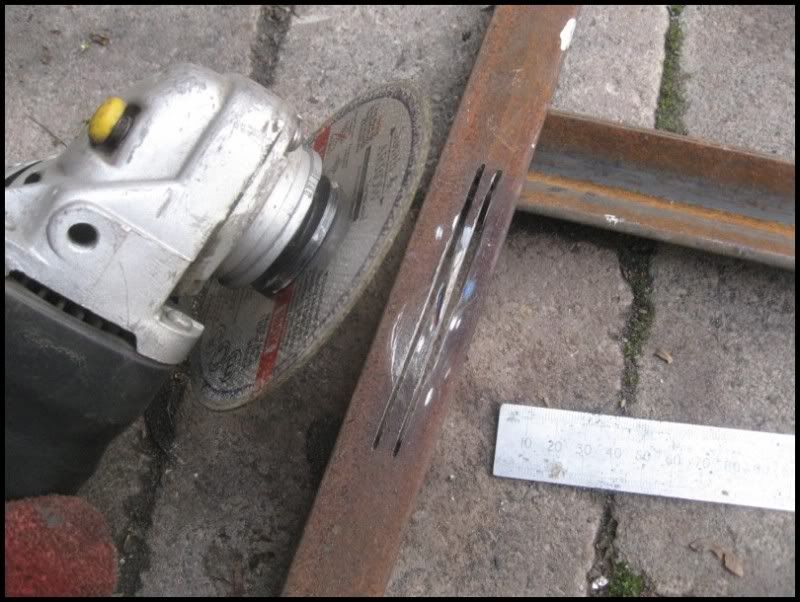
Drilled the ends and ended up with a nice slot (it will become obvious why later...)
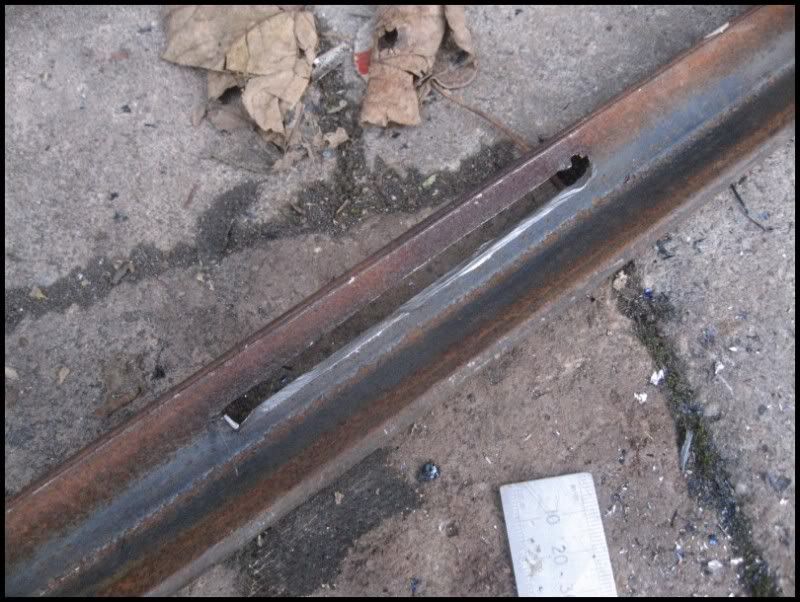
Cut a shorter length and tack welded it to the longer length. Checked for square then welded properly
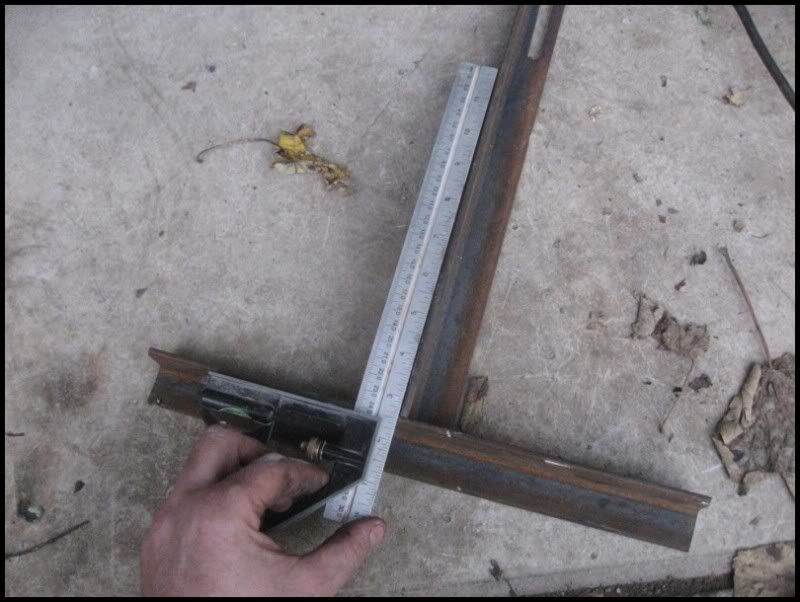
I then welded 2 150mm long pieces at 90 degrees to the long length. The distance between them being around 573mm
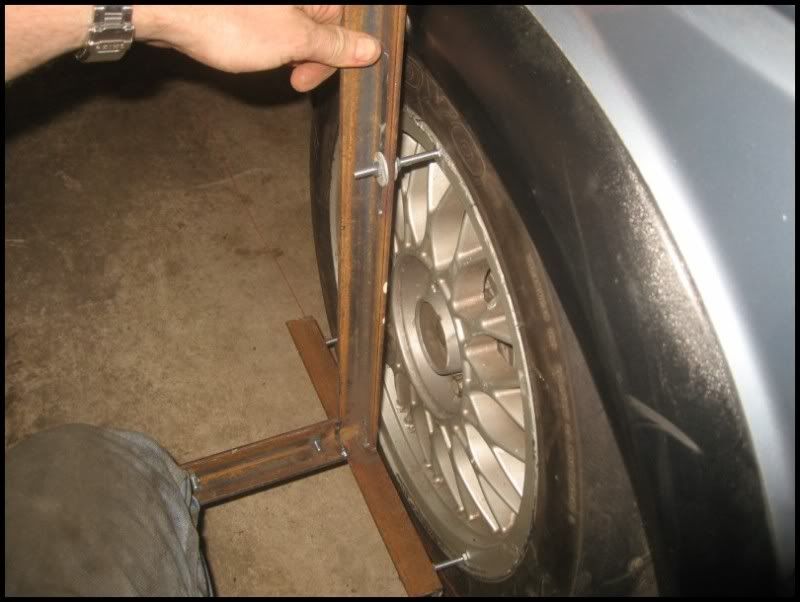
I then drilled 2 holes on the short length at equal distances from the centre. These are where the bolts will go that sit onto the wheel. I then added another bolt into the `slot`. Position the bolts so all 3 sit on the flat part of the wheel. The `slot` means the top bolt can be moved, allowing the use of the gauge on varying diameter wheels.
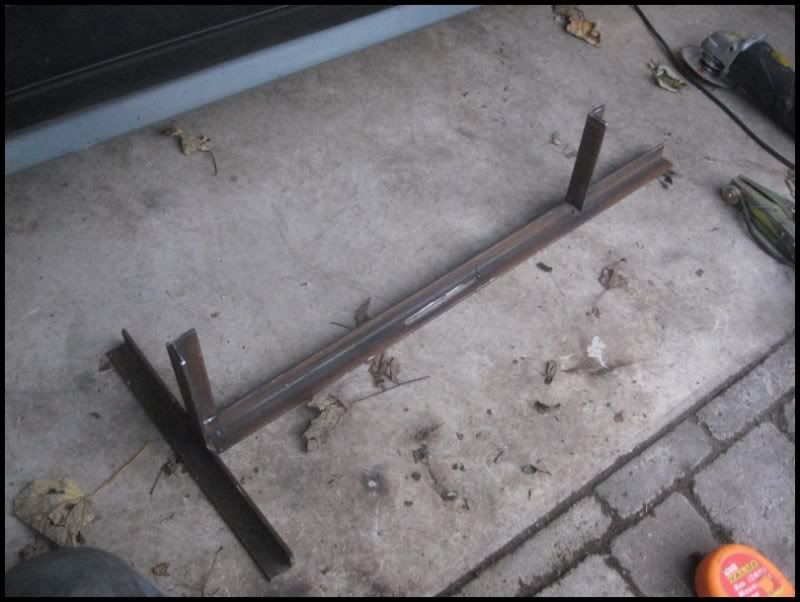
With the gauge on a FLAT surface, I quickly set it up using a spirit level, adjusting each bolt until every check was level, then I locked the nuts.
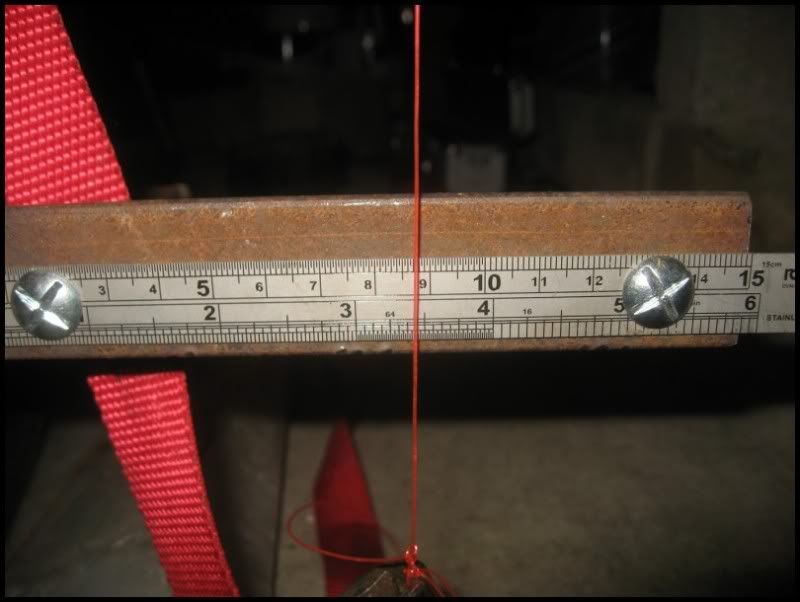
A 150mm steel rule was fitted onto the bottom `arm`
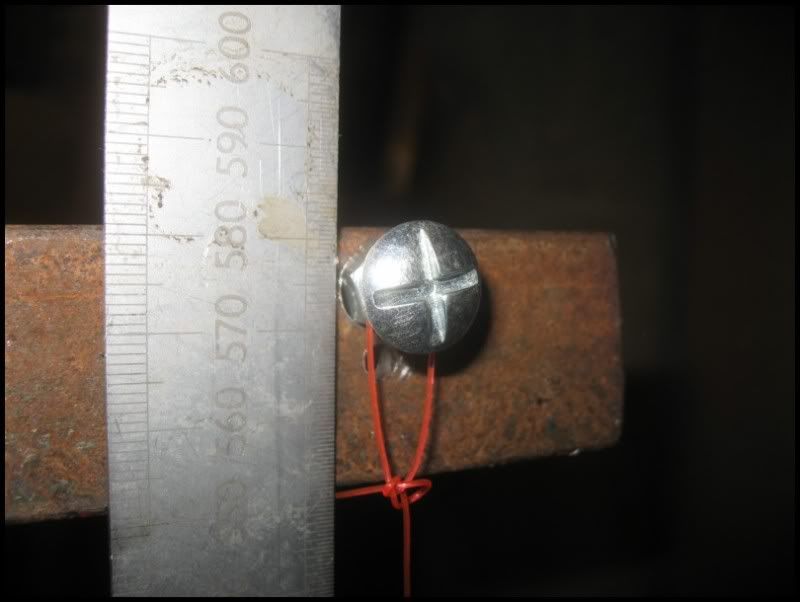
A large headed bolt fitted 573mm above the steel rule was secured to the top `arm`
I then used some of the Shock Leader fluorescent fishing line, tied a loop at the top and an old socket on the bottom to act as a weight.
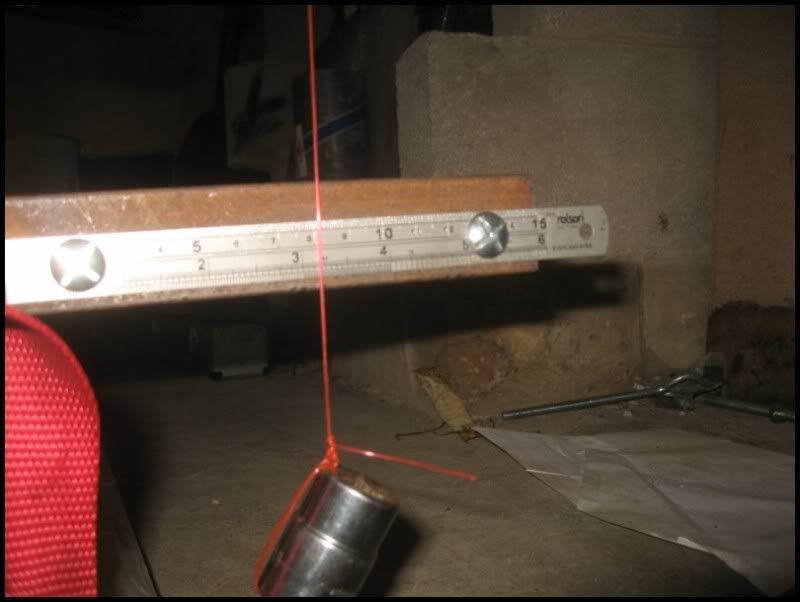
I held the gauge against a vertical surface and let the line hang until still
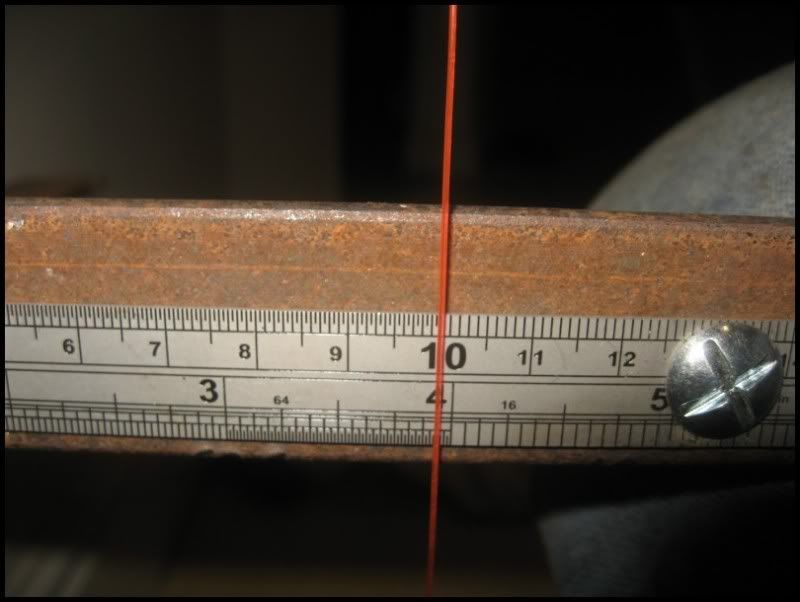
Ensure the line JUST clears the steel rule, this makes it easy to read, but means the line is not catching on the rule, affecting the reading.
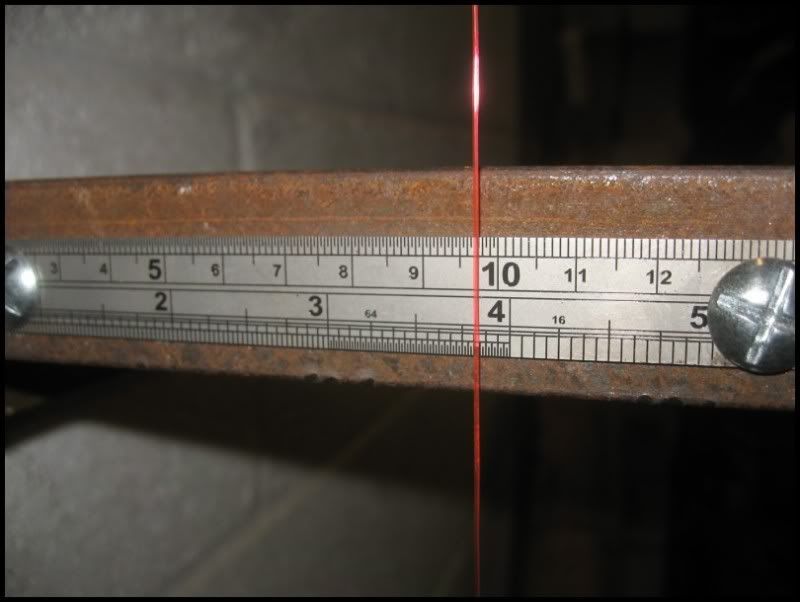
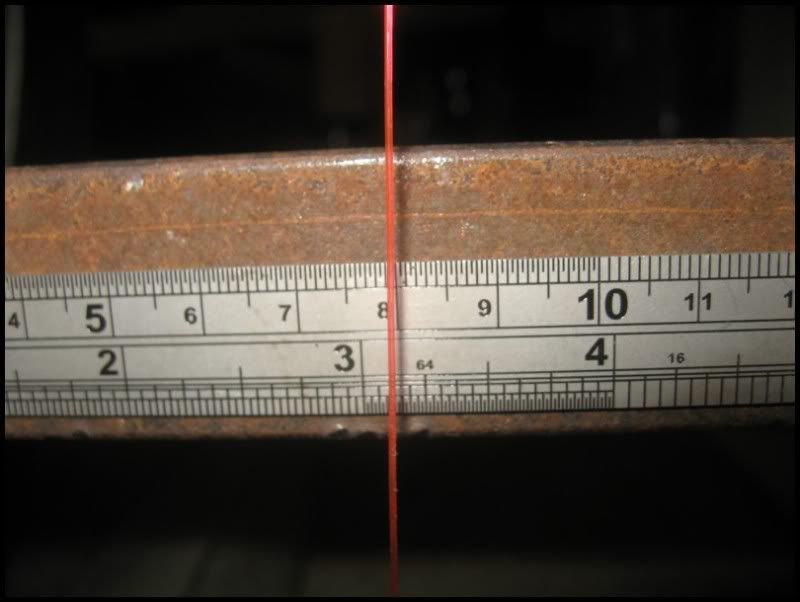
The steel rule needs to be adjusted so the line passes through the 100mm point, here it is at 97mm
Move the steel rule left / right, I made oversized holes to allow adjustment. Your gauge is now `zeroed`. I checked against several vertical surfaces, walls and doors to check it was accurate, every one showed `zero`
Do NOT adjust the bolts / steel rule, these are now set for vertical.
I secured the gauge to a wheel using a small ratchet I had handy
When I had setup the camber before, I`d used a digital gauge and set it to -1.3 Degrees.
Using this method, 1mm is 0.1degrees, so 10mm is 1 degree.
My gauge showed - 12.5mm, (- 1.25 degrees) I`d say thats pretty near to the -1.3 I set it to with the Digital gauge !
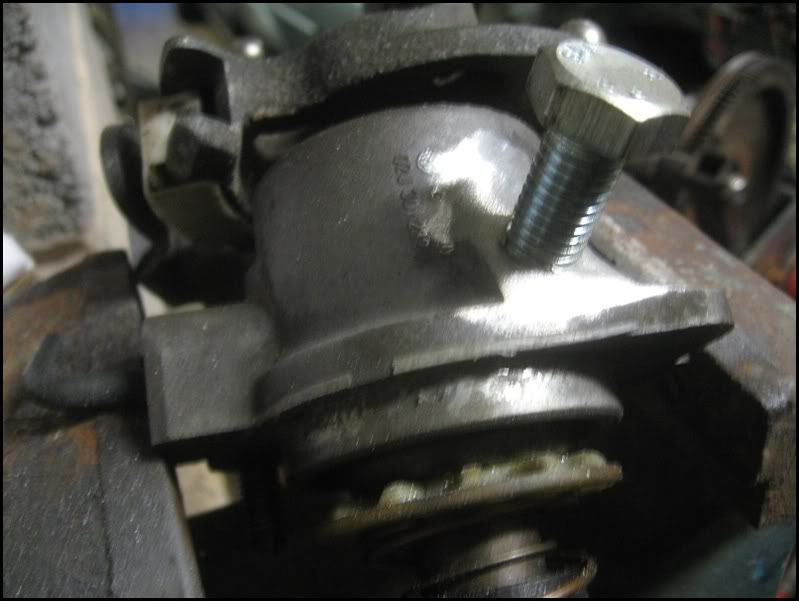
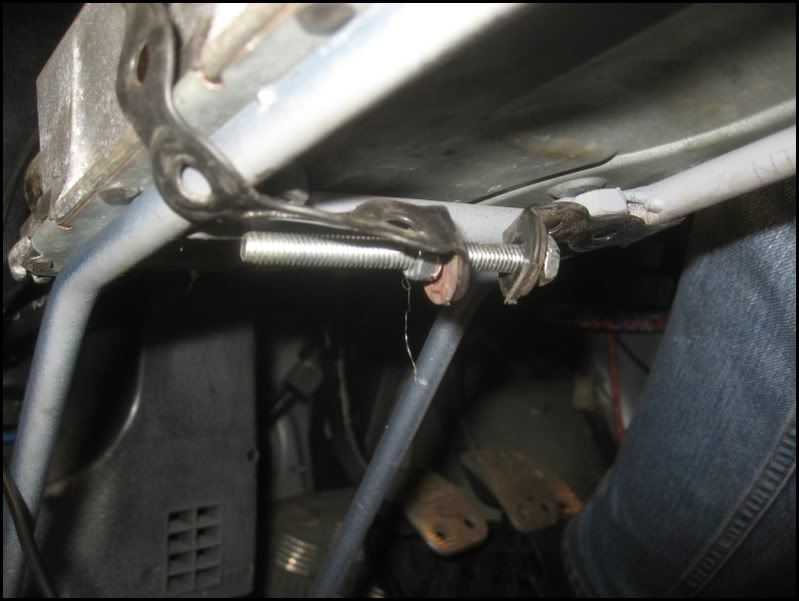
Adjusting camber on a MK2 Golf is easy, I loosened the strut mounting bolts.
Adjusted the camber to the maximum I could get, - 2.05 degrees (20.5mm)
Repeated for the other side and now have -2 degrees on each side . This method may appear crude, but the accuracy is high. So long as the gauge is `zeroed` correctly, the resulting camber measurements are very accurate .
If you adjust the camber AFTER the toe, if you re-check the toe it will probably be out.
Camber first, toe after!
If you add negative camber the track will read more 'toe out'
As I didn`t own a camber gauge, I decided to make one. I`ve read loads of text guides, but no comprehensive photo guide, so I thought I`d make one
I used 30mm Steel Angle as I had several bits laying around. I wanted to be able to use the gauge on varying sized wheels, so I cut a slot into the angle with a 1mm slitting disk
Drilled the ends and ended up with a nice slot (it will become obvious why later...)
Cut a shorter length and tack welded it to the longer length. Checked for square then welded properly
I then welded 2 150mm long pieces at 90 degrees to the long length. The distance between them being around 573mm
I then drilled 2 holes on the short length at equal distances from the centre. These are where the bolts will go that sit onto the wheel. I then added another bolt into the `slot`. Position the bolts so all 3 sit on the flat part of the wheel. The `slot` means the top bolt can be moved, allowing the use of the gauge on varying diameter wheels.
With the gauge on a FLAT surface, I quickly set it up using a spirit level, adjusting each bolt until every check was level, then I locked the nuts.
A 150mm steel rule was fitted onto the bottom `arm`
A large headed bolt fitted 573mm above the steel rule was secured to the top `arm`
I then used some of the Shock Leader fluorescent fishing line, tied a loop at the top and an old socket on the bottom to act as a weight.
I held the gauge against a vertical surface and let the line hang until still
Ensure the line JUST clears the steel rule, this makes it easy to read, but means the line is not catching on the rule, affecting the reading.
The steel rule needs to be adjusted so the line passes through the 100mm point, here it is at 97mm
Move the steel rule left / right, I made oversized holes to allow adjustment. Your gauge is now `zeroed`. I checked against several vertical surfaces, walls and doors to check it was accurate, every one showed `zero`
Do NOT adjust the bolts / steel rule, these are now set for vertical.
I secured the gauge to a wheel using a small ratchet I had handy
When I had setup the camber before, I`d used a digital gauge and set it to -1.3 Degrees.
Using this method, 1mm is 0.1degrees, so 10mm is 1 degree.
My gauge showed - 12.5mm, (- 1.25 degrees) I`d say thats pretty near to the -1.3 I set it to with the Digital gauge !
Adjusting camber on a MK2 Golf is easy, I loosened the strut mounting bolts.
Adjusted the camber to the maximum I could get, - 2.05 degrees (20.5mm)
Repeated for the other side and now have -2 degrees on each side . This method may appear crude, but the accuracy is high. So long as the gauge is `zeroed` correctly, the resulting camber measurements are very accurate .
If you adjust the camber AFTER the toe, if you re-check the toe it will probably be out.
Camber first, toe after!
If you add negative camber the track will read more 'toe out'
Quick update of my build thread.
At the Anglesey trackday, first trackday since Elvington (where it performed faultlessley). Morning was wet, but noticed a tiny bit of Pinking under full load, so tweaked the timing a TINY bit, to just stop it pinking.
Car felt OK, best reference was out of the hairpin, in 3rd, was changing into 4th Gear before a white line on the track. Every lap and it was about 20 ft before the white line.
The car felt to be getting slower, did the hairpin > white line test again and I wasn`t needing 4th until 30ft AFTER the line

Cars that I could catch in the morning, were leaving me in the afternoon. I think it was noticeable from mid-morning onwards.
Did a side by side drag race with a mate, he was 2-up, 170HP (ish), I was by myself, he pulled away as if I was in a gear too high
Car was a pig to start today when I brought it home. Ended up unplugging the Coil > dictributer HT lead, turned it over for 10 secs, reconnected lead and it fired up 1st time, was then hesitant to tickover.
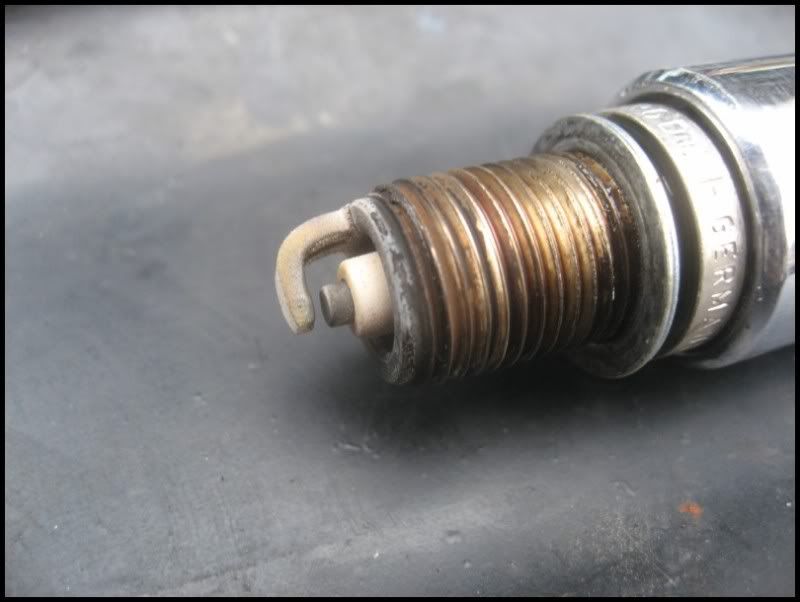
All 4 plugs are very light coloured, no oil in water or water in oil, so pretty sure HG is OK.
The symptoms suggest to me some sort of fuelling issue. Don`t have the gauges to check the pressure, so having a look for solutions.
Cam timing is OK, TDC lines up to the mark on the cam pulley, so that hasn`t slipped.
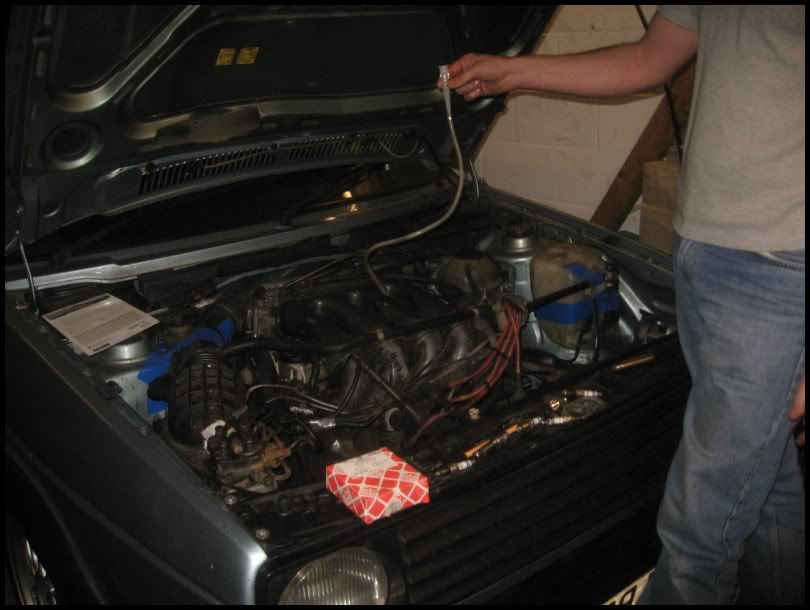
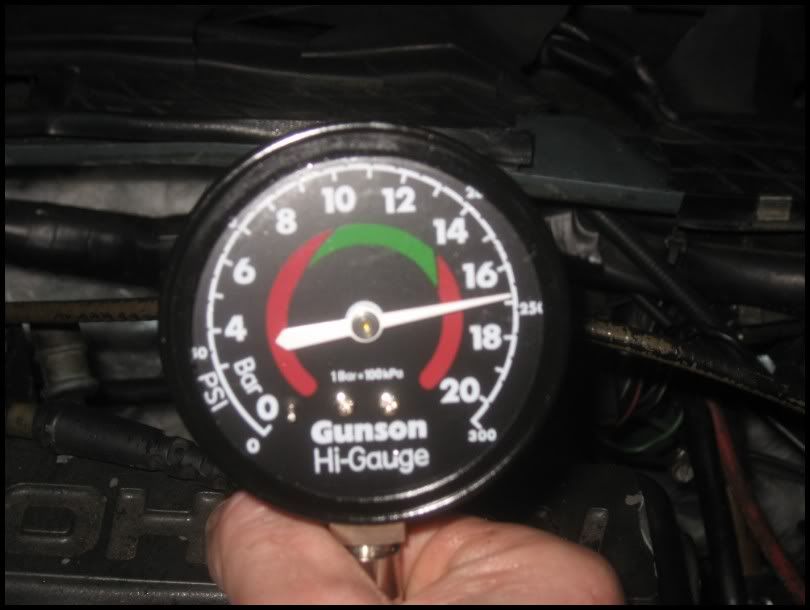
Warmed car up then disconnected Coil then carried out my compression test.
Removed all spark plugs, fitted Compression Gauge and had helper (Matty), full depress the throttle and turn the engine over a few times.
All 4 cylinders were withing 0.2 Bar of each other.

DRY compression results
Cylinder 1 - 13.1 Bar
Cylinder 2 - 12.9 Bar
Cylinder 3 - 13.1 Bar
Cylinder 4 - 13.0 Bar
That is as good an indication as I can get that the HG is OK :thumb:
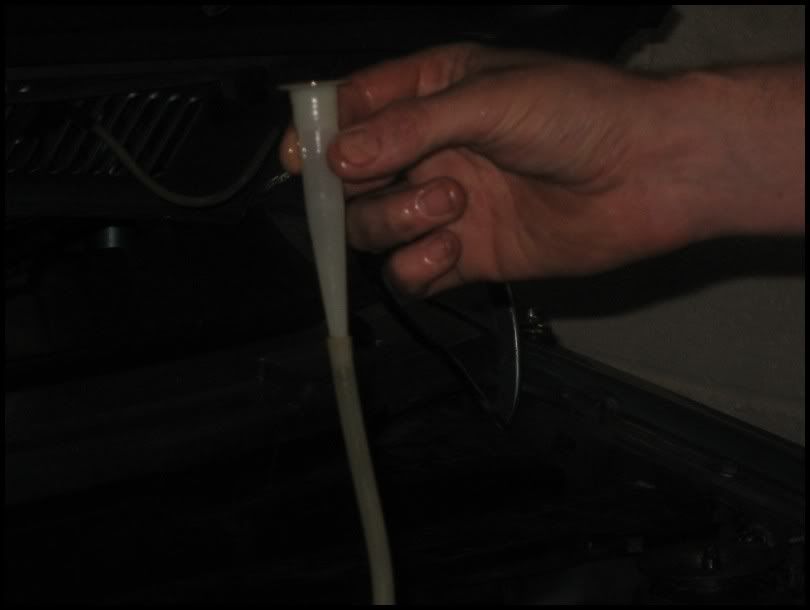
Next was a `wet` compression test. The plugs are deep inside the head on the Golf, so I needed to get a bit of Oil into the Bores. I used a bit of brake bleeding hose and the end of a Silicone tube as a small `funnel`.
Used clean fresh engine oil to run a small amount into Cylinder 1
Turned the engine over twice, with an old rag over the hole to stop the oil blowing all over. I then fitted the compression gauge and carried out the compression test. Repeated for all 4 cylinders.
WET compression results
Cylinder 1 - 16.7 Bar
Cylinder 2 - 16.6 Bar
Cylinder 3 - 16.8 Bar
Cylinder 4 - 16.7 Bar
That (I think), tells me the engine is in pretty good condition. The wet results let me know there is some bore / piston ring wear which I had already suspected and discussed with UB at Anglesey (I`m getting a bit of pressure in my oil catch pot, indicating piston blow-by).
Next tests I`ll be doing is the Fuel pressure, I need to get an adapter on Monday to fit my gauge to the fuel lines.
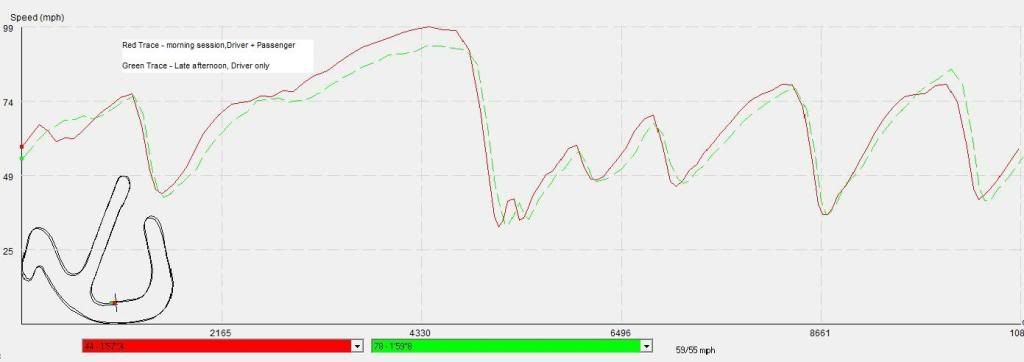
Had a GOOD look at the telemetry from the weekend today (no screenshots, but I will when I have time).
Compared several morning laps (2-up) and late afternoon laps (when I was 1-up).
Best morning lap was 1:57 That included a lift for Church and noticeable drop in corner speed., I was flat through there all afternoon.I STILL achieved a 3mph higher speed in the morning than in the afternoon, even after being flat for the previous corner and no passenger.
On the run to / from the hairpin, the afternoon traces clearly fall away as the car accelerates. I achieved 7mph LESS on apprach to the hairpin and 9MPH LESS on the straight after the hairpin in the afternoon. Best afternoon lap, in the dry and 1-up was 1:59.8
At least that ties in with my seat of the pants feeling and the `white line > 4th` benchmark I`d been using.
Trace from Anglesey, the best lap in the morning and the best late afternoon (1-up) lap
As you can see, Apex speeds are similar, but acceleration, even with passenger is much better (red trace). The Red traces in acceleration zones are `steeper` and are from the morning.
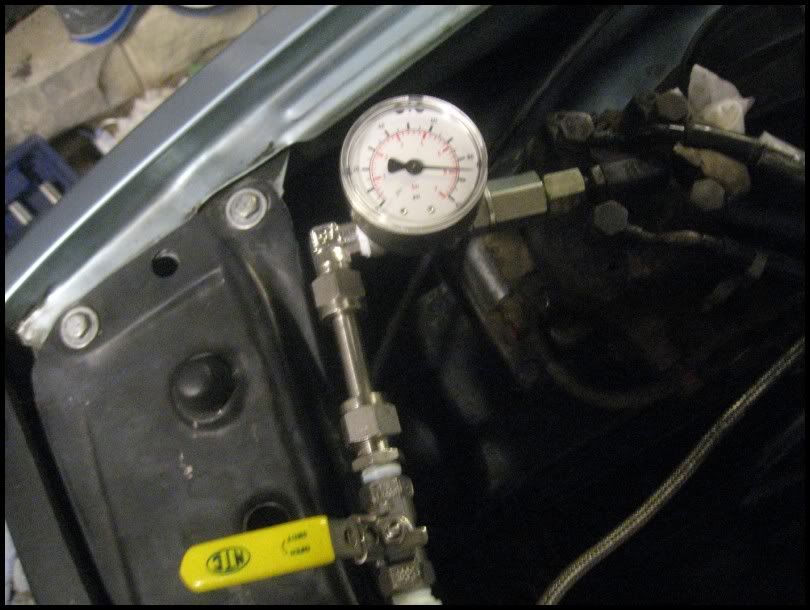
Using the information on ClubGTi HERE I tested my Fuel control and system pressure.
Called at my local Pirtek store to buy the necessary fittings.
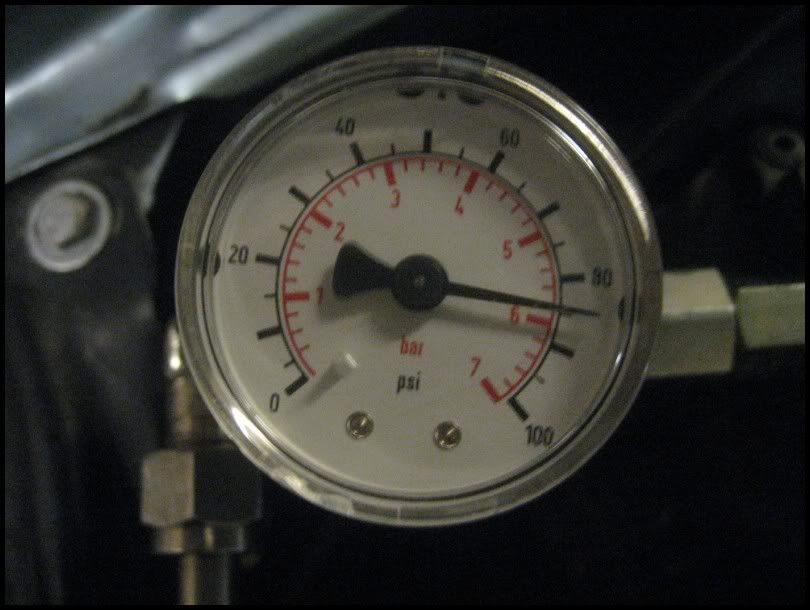
Connected up the test gauge / valve
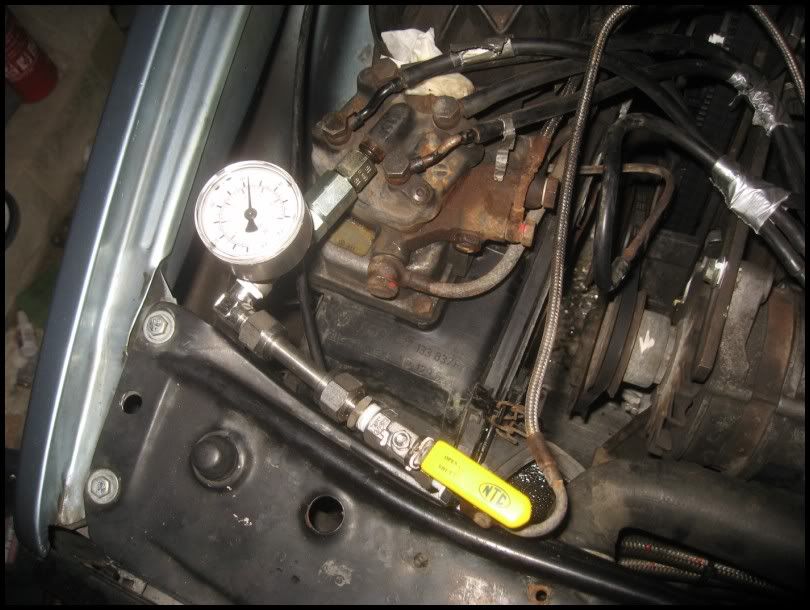
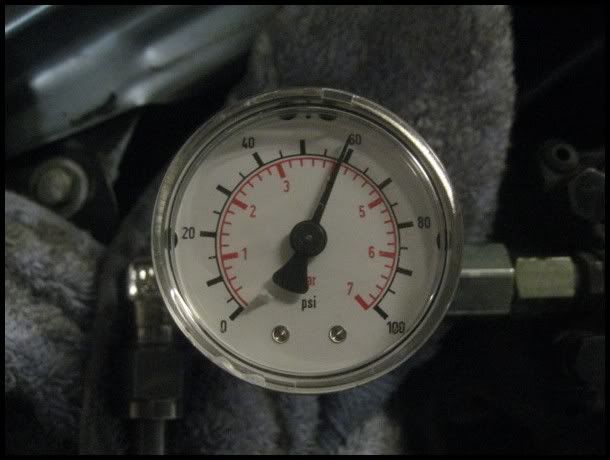
Started Engine, when settled, saw thew Control pressure which should be 48psi (3.3Bar). Mine was 58psi (4Bar). This is BAD, higher actually means LESS fuel, which is what I was seeing on my plugs compared to before.
I then closed the Valve to check the System pressure
This should be around 5 Bar, mine was almost 6 !
I made a short video to show how to do it (I`ll add this to my build thread later).
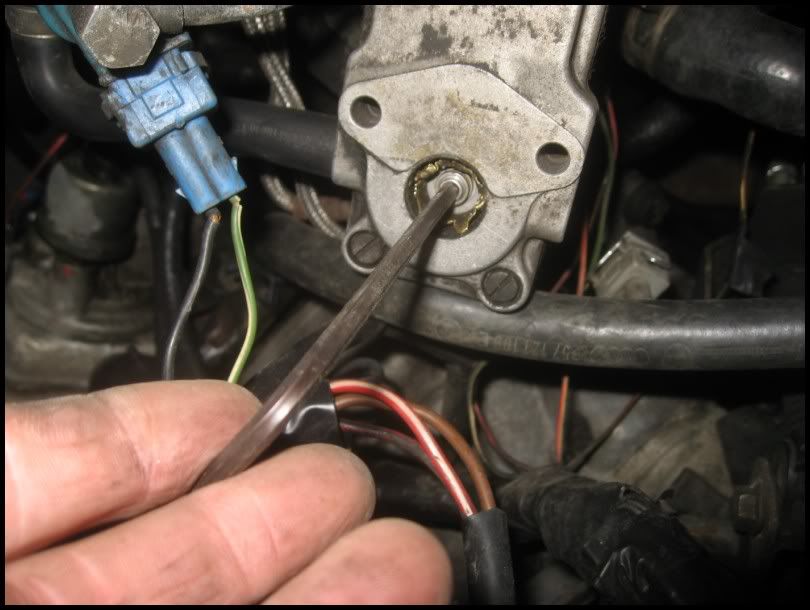
To adjust the Control pressure, I need to adjust to Warm Up Regulator, however, I`m going to take the car for a short run, adjust it then go on the same run to see if I can see the difference :thumb:
Fingers crossed thats what it is, the symptoms pointed to the Compression or Fuel, tests so far indicate Fuel.. I`ll be back to report more soon...
Tried adjusting the WUR and the adjusting allen key made NO difference. Now I am sure thats the problem, when it was setup at stealth, adjusting the allen key affected the control pressure (as it should). I`ll source another WUR and fit that. Hopefully it will be the source of the missing horsepower (I`m pretty confident it is)..
SUCCESS :thumb:
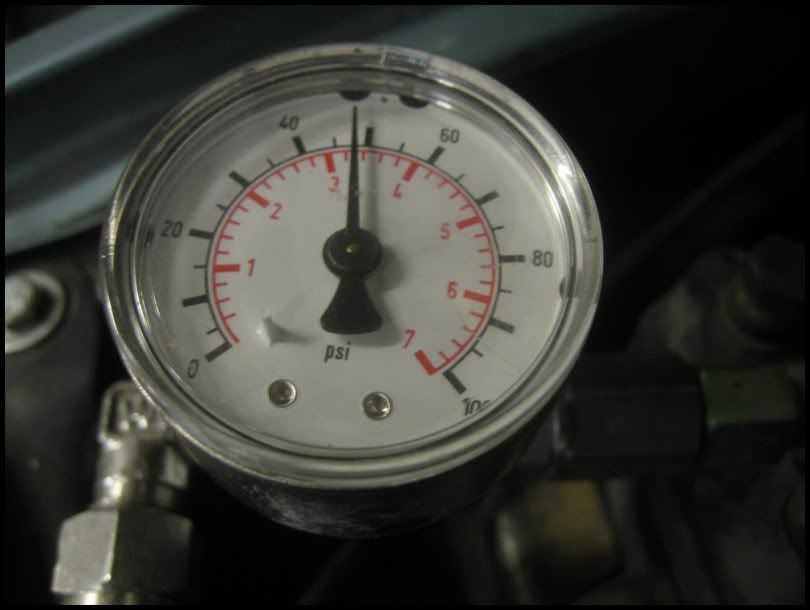
Steph kindly sent me a spare WUR he had to try. Fitted it into the fuel system, after letting the engine get to operating temperature, I adjusted the control pressure using a 4mm allen key.
Set pressure to 48psi
Took car for a drive and it seemed fine. Reset timing to what it was originally and there was NO pinking and it pulled much better. Went to Oulton park yesterday and it ran sweetly, plug colouring normal, no pinking with 6 degrees of timing again
Looking back, the signs were there. It started pinking on the warmup laps at Anglesey even though nothing had changed, I had to back the timing off several degrees to stop the pinking and then more after lunch, hence the drop in power. The WUR was obviously failing and I assumed the distributor had slipped rather than realising there was a problem. Hindsight is wonderful isnt`t it :lol:
Anyway, it is running great again, although I do think the piston rings are passing, there is definate pressure in the breather pipe now, so an engine overhaul is on the cards sometime next year.
A compression tester, fuel pressure tester and simple checks pointed to the WUR and that was the problem in the end.
The last 2009 trackday was at Oulton last week
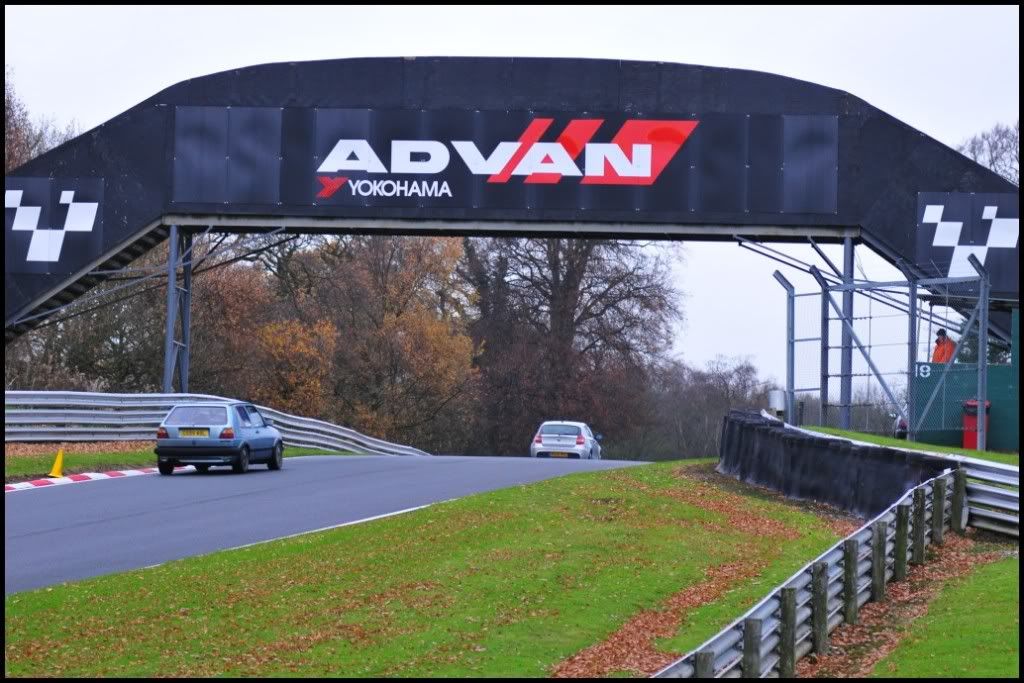
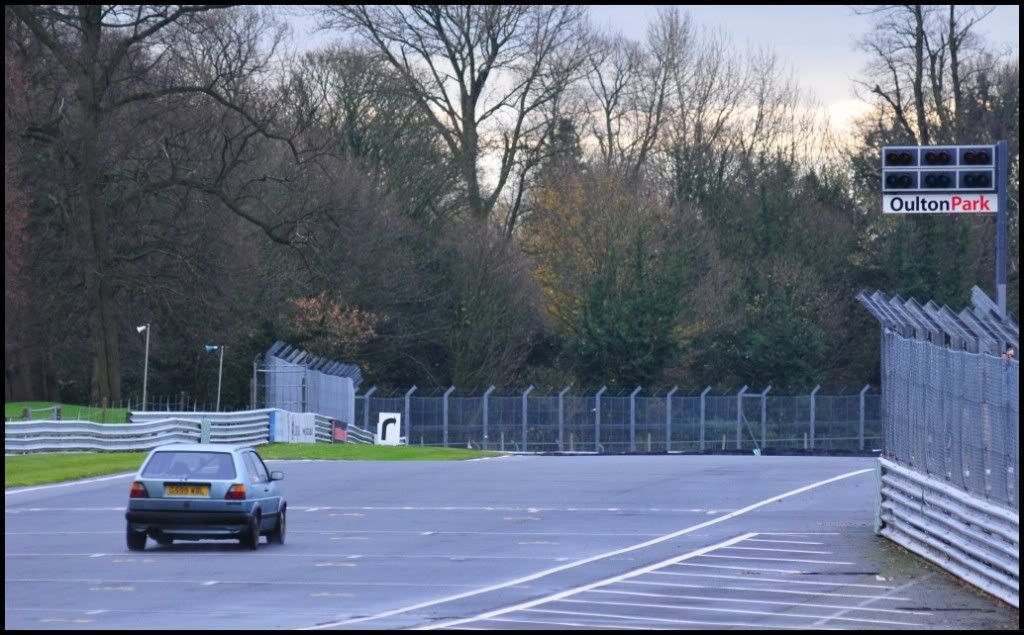
My Oulton `moment`...
Wet Oulton the other day, Couldn`t get into 3rd before the corner, ended up entering too quickly and inevitably, the rear started coming round. I`m pretty pleased that unlike at Bedford last year, I didn`t panic, stamp on the brakes or react too slowly, but managed to correct the slide and carry on my merry way.
I`m quite pleased with that.
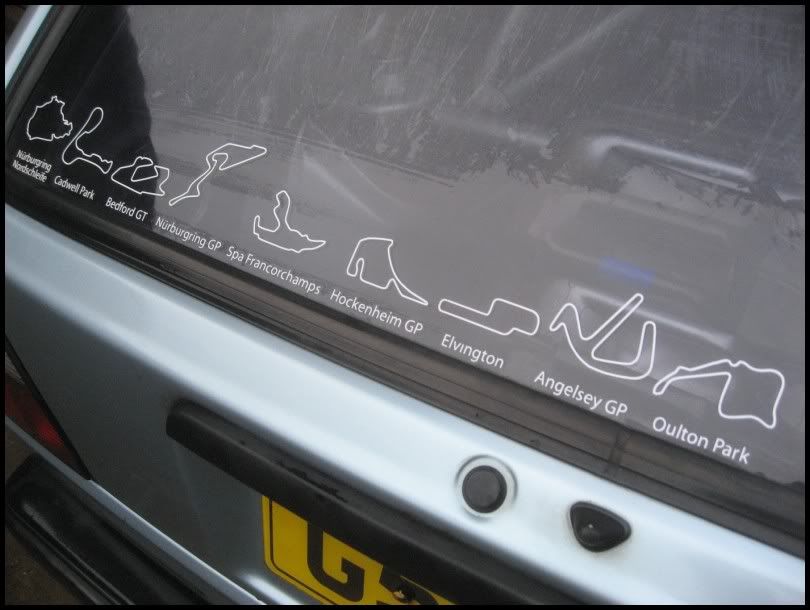
My list of tracks completed is growing nicely
The car has now been parked away for the winter, first trackday will probably be Cadwell next Feb. I have a few little jobs that I hope to do over the winter.
At the Anglesey trackday, first trackday since Elvington (where it performed faultlessley). Morning was wet, but noticed a tiny bit of Pinking under full load, so tweaked the timing a TINY bit, to just stop it pinking.
Car felt OK, best reference was out of the hairpin, in 3rd, was changing into 4th Gear before a white line on the track. Every lap and it was about 20 ft before the white line.
The car felt to be getting slower, did the hairpin > white line test again and I wasn`t needing 4th until 30ft AFTER the line
Cars that I could catch in the morning, were leaving me in the afternoon. I think it was noticeable from mid-morning onwards.
Did a side by side drag race with a mate, he was 2-up, 170HP (ish), I was by myself, he pulled away as if I was in a gear too high
Car was a pig to start today when I brought it home. Ended up unplugging the Coil > dictributer HT lead, turned it over for 10 secs, reconnected lead and it fired up 1st time, was then hesitant to tickover.
All 4 plugs are very light coloured, no oil in water or water in oil, so pretty sure HG is OK.
The symptoms suggest to me some sort of fuelling issue. Don`t have the gauges to check the pressure, so having a look for solutions.
Cam timing is OK, TDC lines up to the mark on the cam pulley, so that hasn`t slipped.
Warmed car up then disconnected Coil then carried out my compression test.
Removed all spark plugs, fitted Compression Gauge and had helper (Matty), full depress the throttle and turn the engine over a few times.
All 4 cylinders were withing 0.2 Bar of each other.
DRY compression results
Cylinder 1 - 13.1 Bar
Cylinder 2 - 12.9 Bar
Cylinder 3 - 13.1 Bar
Cylinder 4 - 13.0 Bar
That is as good an indication as I can get that the HG is OK :thumb:
Next was a `wet` compression test. The plugs are deep inside the head on the Golf, so I needed to get a bit of Oil into the Bores. I used a bit of brake bleeding hose and the end of a Silicone tube as a small `funnel`.
Used clean fresh engine oil to run a small amount into Cylinder 1
Turned the engine over twice, with an old rag over the hole to stop the oil blowing all over. I then fitted the compression gauge and carried out the compression test. Repeated for all 4 cylinders.
WET compression results
Cylinder 1 - 16.7 Bar
Cylinder 2 - 16.6 Bar
Cylinder 3 - 16.8 Bar
Cylinder 4 - 16.7 Bar
That (I think), tells me the engine is in pretty good condition. The wet results let me know there is some bore / piston ring wear which I had already suspected and discussed with UB at Anglesey (I`m getting a bit of pressure in my oil catch pot, indicating piston blow-by).
Next tests I`ll be doing is the Fuel pressure, I need to get an adapter on Monday to fit my gauge to the fuel lines.
Had a GOOD look at the telemetry from the weekend today (no screenshots, but I will when I have time).
Compared several morning laps (2-up) and late afternoon laps (when I was 1-up).
Best morning lap was 1:57 That included a lift for Church and noticeable drop in corner speed., I was flat through there all afternoon.I STILL achieved a 3mph higher speed in the morning than in the afternoon, even after being flat for the previous corner and no passenger.
On the run to / from the hairpin, the afternoon traces clearly fall away as the car accelerates. I achieved 7mph LESS on apprach to the hairpin and 9MPH LESS on the straight after the hairpin in the afternoon. Best afternoon lap, in the dry and 1-up was 1:59.8
At least that ties in with my seat of the pants feeling and the `white line > 4th` benchmark I`d been using.
Trace from Anglesey, the best lap in the morning and the best late afternoon (1-up) lap
As you can see, Apex speeds are similar, but acceleration, even with passenger is much better (red trace). The Red traces in acceleration zones are `steeper` and are from the morning.
Using the information on ClubGTi HERE I tested my Fuel control and system pressure.
Called at my local Pirtek store to buy the necessary fittings.
Connected up the test gauge / valve
Started Engine, when settled, saw thew Control pressure which should be 48psi (3.3Bar). Mine was 58psi (4Bar). This is BAD, higher actually means LESS fuel, which is what I was seeing on my plugs compared to before.
I then closed the Valve to check the System pressure
This should be around 5 Bar, mine was almost 6 !
I made a short video to show how to do it (I`ll add this to my build thread later).
To adjust the Control pressure, I need to adjust to Warm Up Regulator, however, I`m going to take the car for a short run, adjust it then go on the same run to see if I can see the difference :thumb:
Fingers crossed thats what it is, the symptoms pointed to the Compression or Fuel, tests so far indicate Fuel.. I`ll be back to report more soon...
Tried adjusting the WUR and the adjusting allen key made NO difference. Now I am sure thats the problem, when it was setup at stealth, adjusting the allen key affected the control pressure (as it should). I`ll source another WUR and fit that. Hopefully it will be the source of the missing horsepower (I`m pretty confident it is)..
SUCCESS :thumb:
Steph kindly sent me a spare WUR he had to try. Fitted it into the fuel system, after letting the engine get to operating temperature, I adjusted the control pressure using a 4mm allen key.
Set pressure to 48psi
Took car for a drive and it seemed fine. Reset timing to what it was originally and there was NO pinking and it pulled much better. Went to Oulton park yesterday and it ran sweetly, plug colouring normal, no pinking with 6 degrees of timing again
Looking back, the signs were there. It started pinking on the warmup laps at Anglesey even though nothing had changed, I had to back the timing off several degrees to stop the pinking and then more after lunch, hence the drop in power. The WUR was obviously failing and I assumed the distributor had slipped rather than realising there was a problem. Hindsight is wonderful isnt`t it :lol:
Anyway, it is running great again, although I do think the piston rings are passing, there is definate pressure in the breather pipe now, so an engine overhaul is on the cards sometime next year.
A compression tester, fuel pressure tester and simple checks pointed to the WUR and that was the problem in the end.
The last 2009 trackday was at Oulton last week
My Oulton `moment`...
Wet Oulton the other day, Couldn`t get into 3rd before the corner, ended up entering too quickly and inevitably, the rear started coming round. I`m pretty pleased that unlike at Bedford last year, I didn`t panic, stamp on the brakes or react too slowly, but managed to correct the slide and carry on my merry way.
I`m quite pleased with that.
My list of tracks completed is growing nicely
The car has now been parked away for the winter, first trackday will probably be Cadwell next Feb. I have a few little jobs that I hope to do over the winter.
Long overdue update. One of a few as I`m doing a fair bit at the moment.
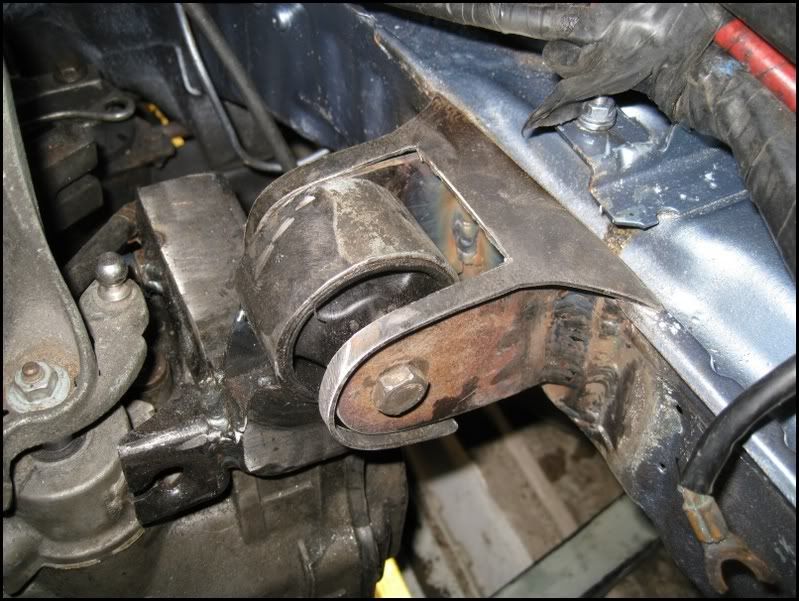
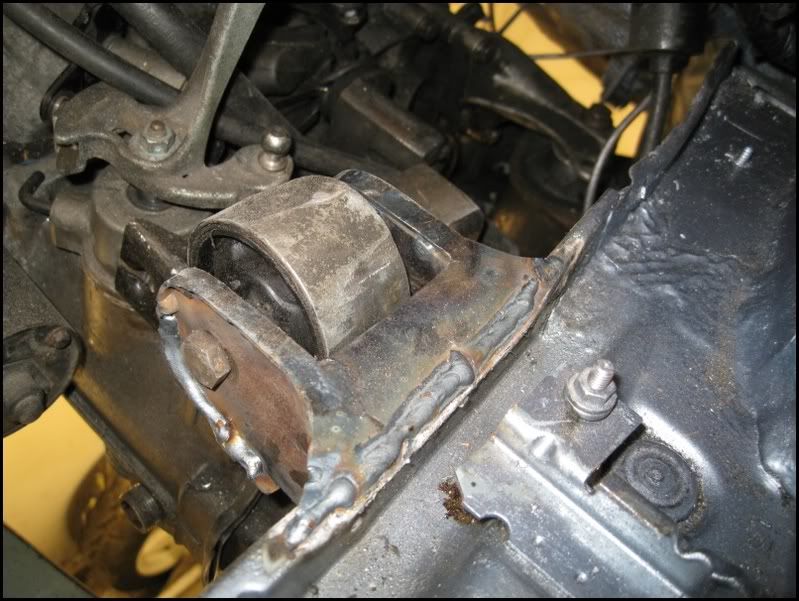
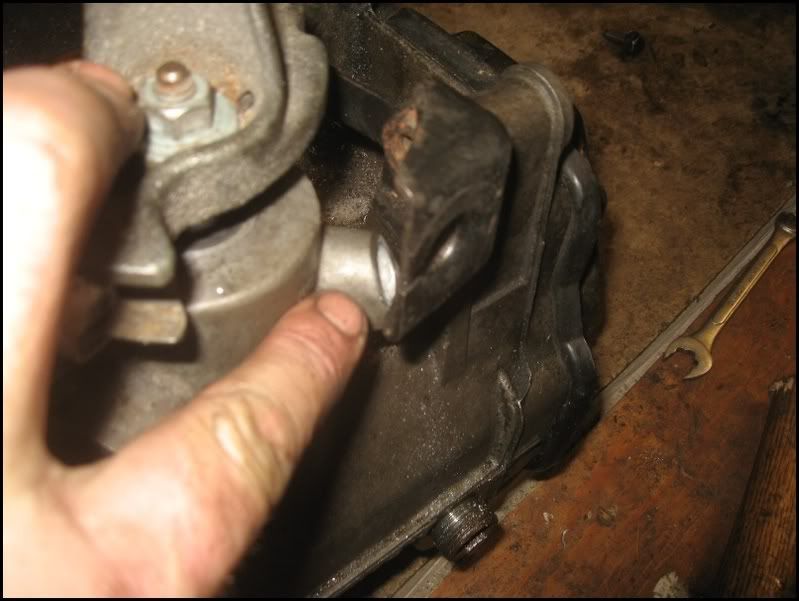
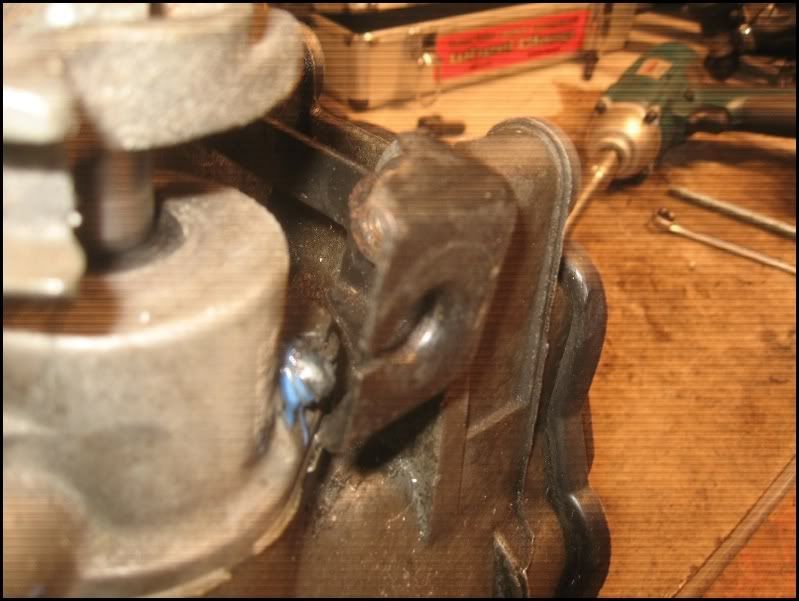
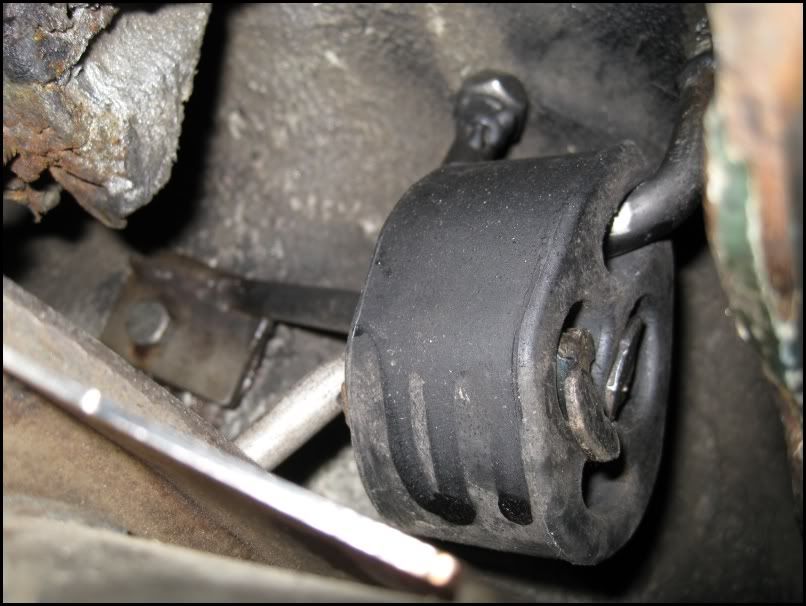
This update is about the gearbox mount I made. I`ve read many posts on them and Steve_R kindly sent me a spare mount he had aquired.
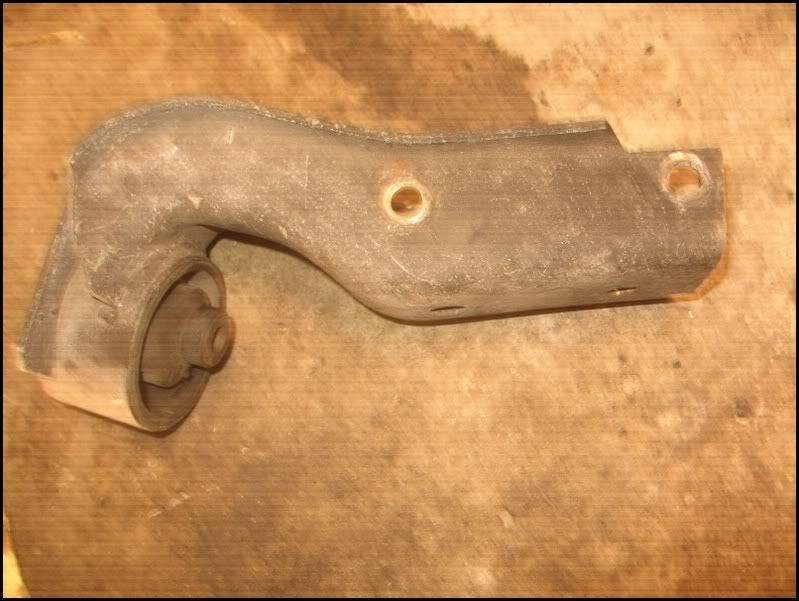
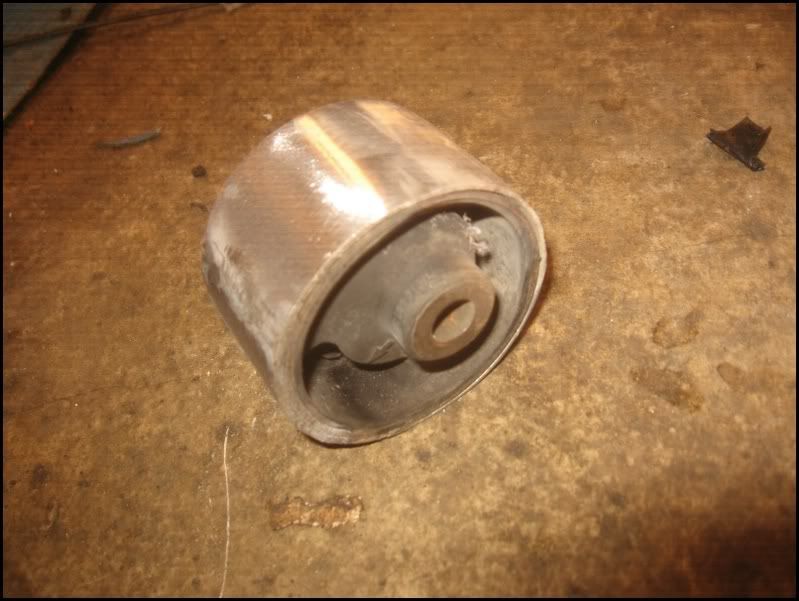
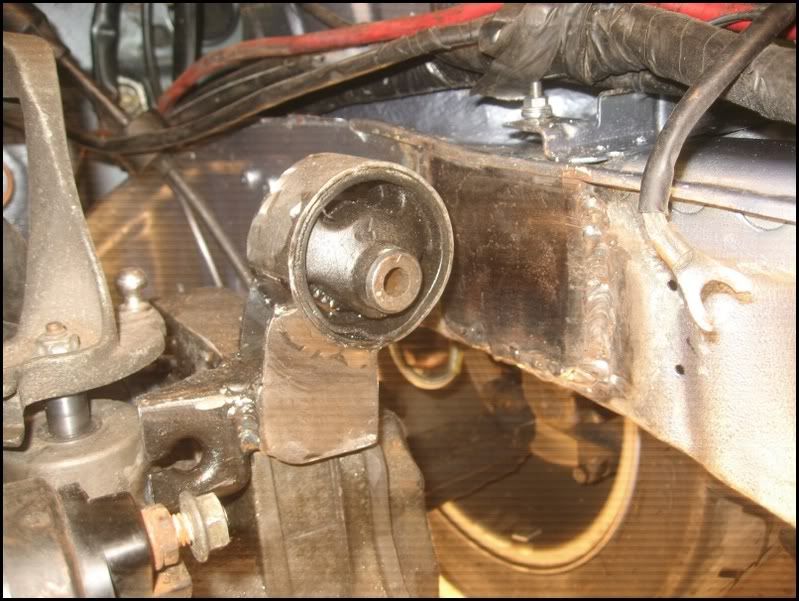
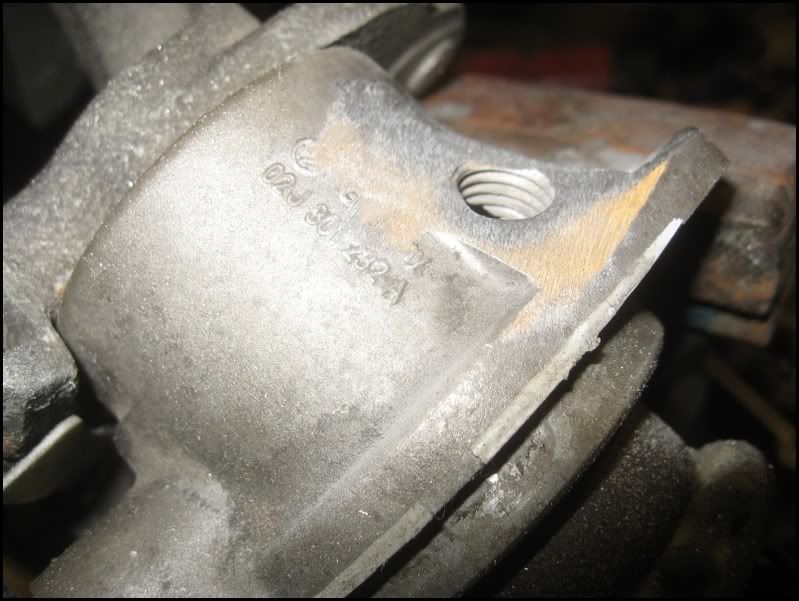
Cut away the old bracket and was left with the bush and rubber mount
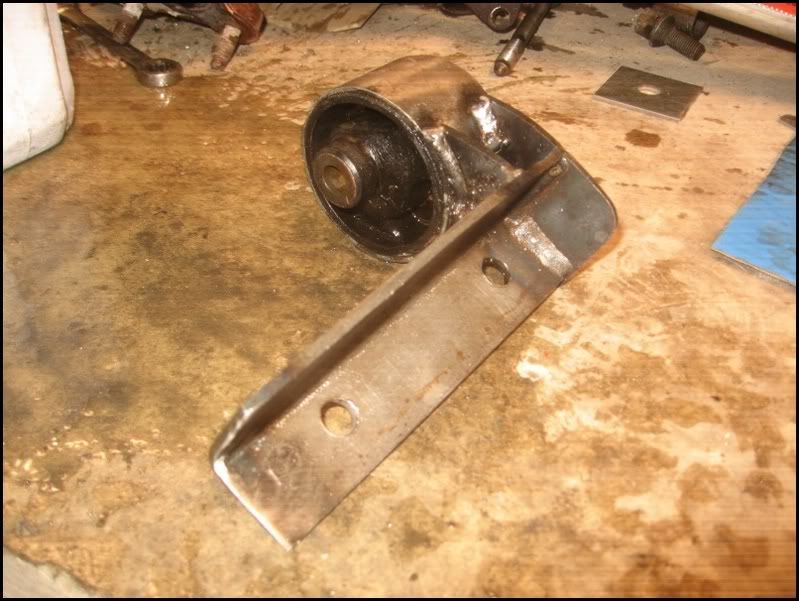
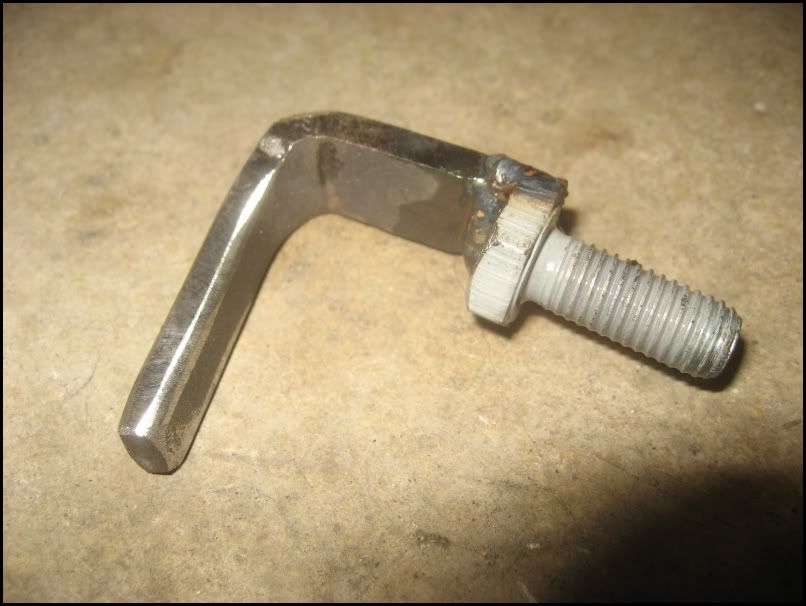
Camera battery died, so by the time it had recharged, I`d almost finished. I cut the clutch cable bracket, kept the part I needed to secure the Clutch cable, then welded that to my new bracket.
As I only have a Vice, Hammer, Angle Grinder and Welder, my fabricating skills may not be quite as good as they could be, however, after bending the plate 90 degrees, I realised I couldnt bend the next part, so I left it as a letter `L`, then welded on a flat piece to complete the `U` shape I was after.
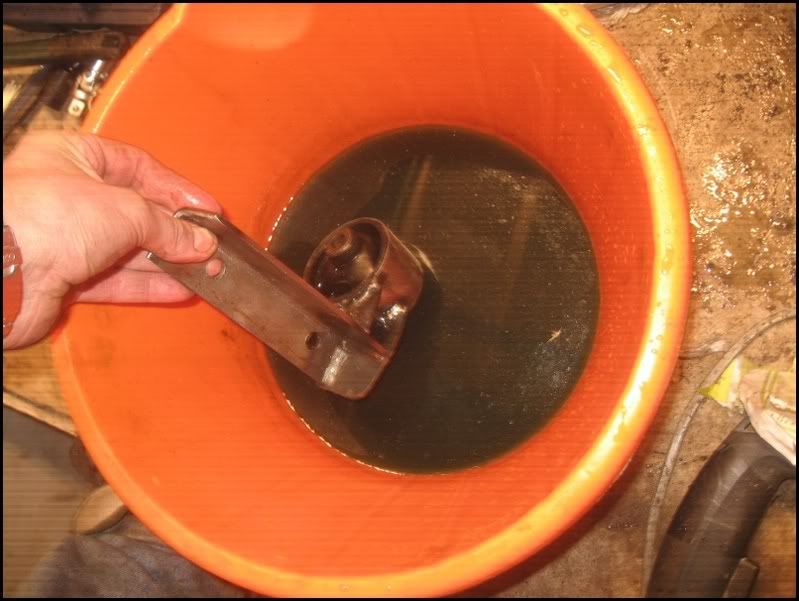
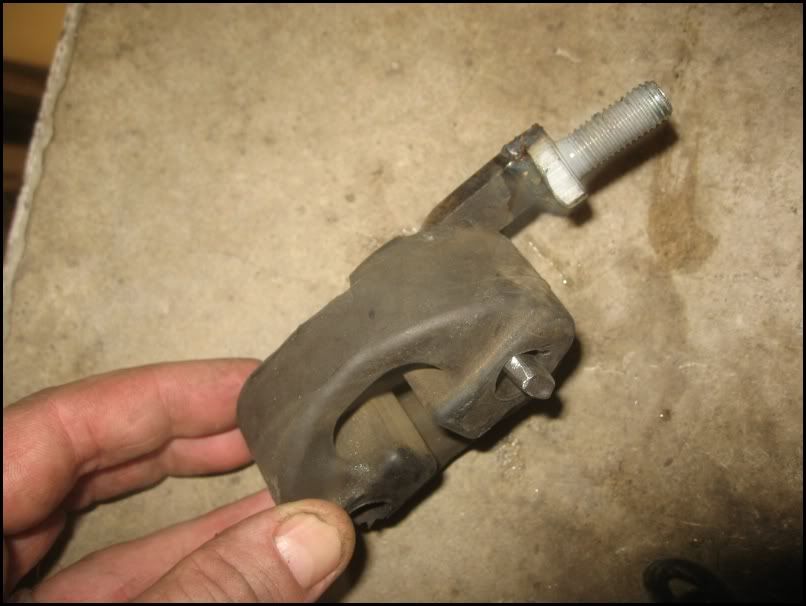
As the rubber was in the sleeve, when welding the support arms to the sleeve, I welded a few seconds then dunked it all in a bucket to cool it and protect the rubber.
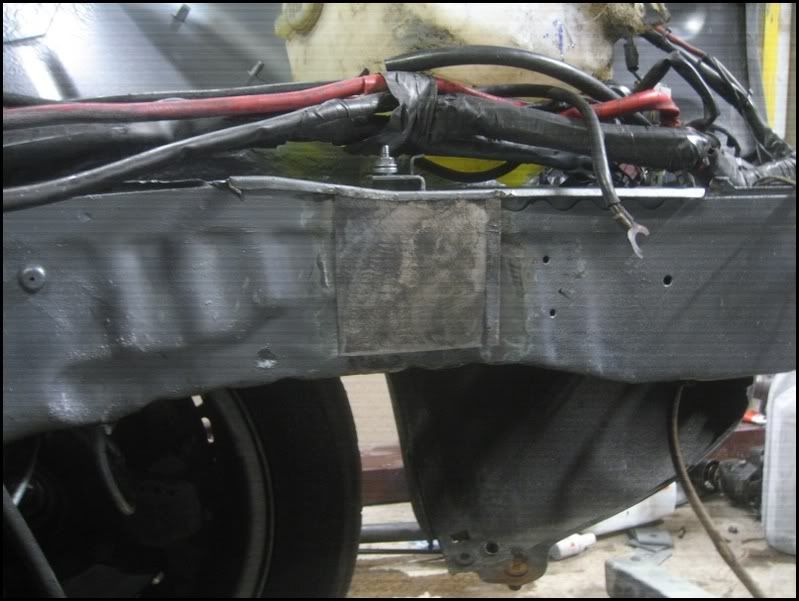
Welded some plate to the chassis leg
Then mounted the bracket on the gearbox to enable correct placing of the 2 plates to support the mount.
I then welded the 2 plates to the chassis leg
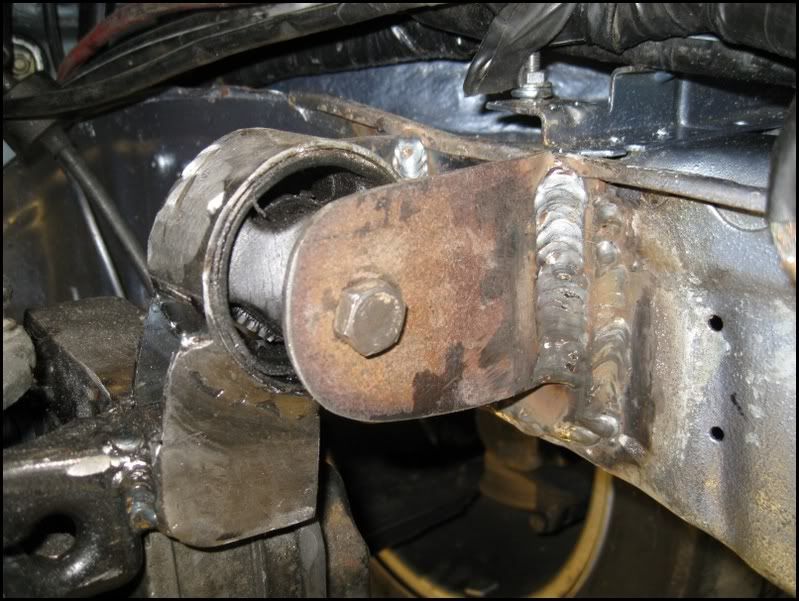
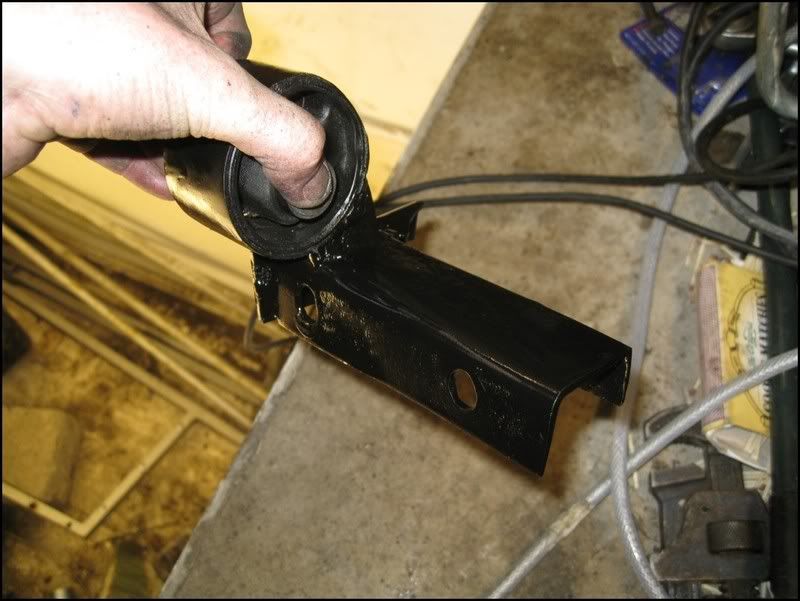
I was concerned the plates would flex side to side, so I cut some more plate and bent it.
This was then welded into plate to significantly strengthen the whole bracket
A few coats of matt black for the bracket
Here you can see the captive nut I welded on the back.
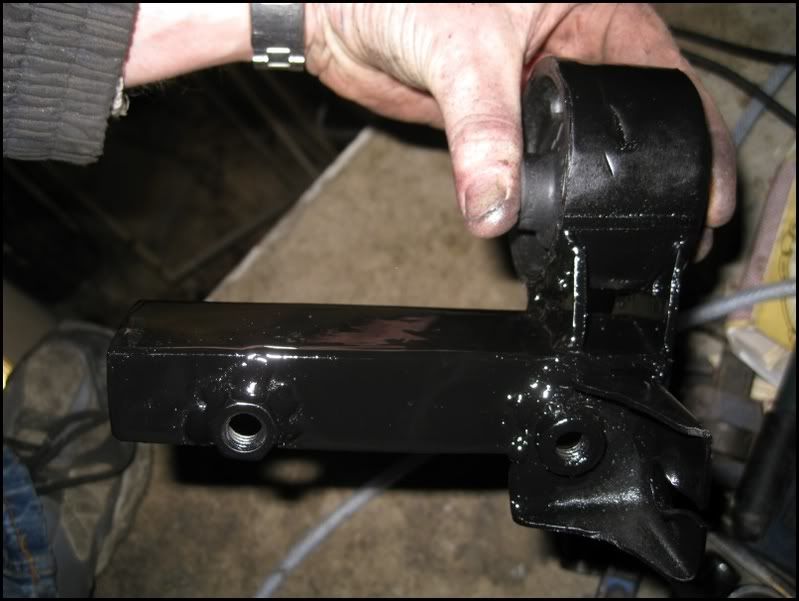
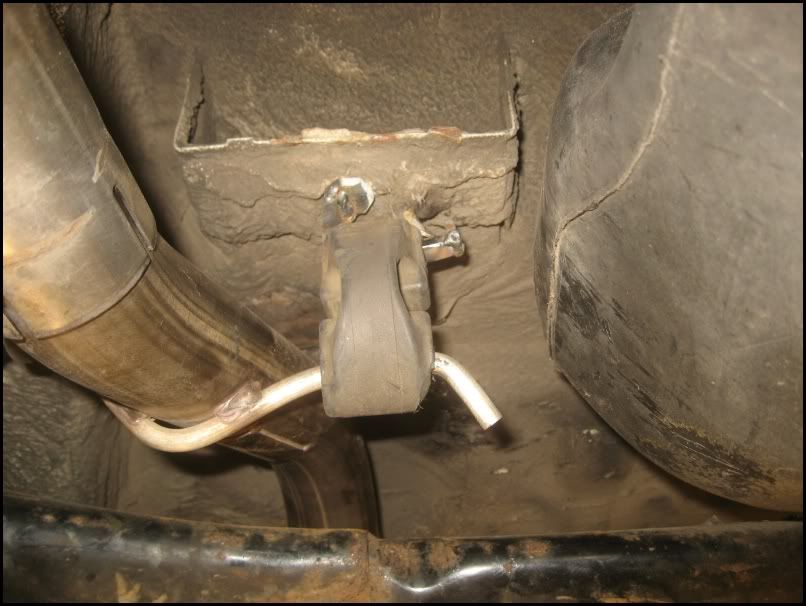
Paint the chassis leg mount

Then attach the whole thing together.
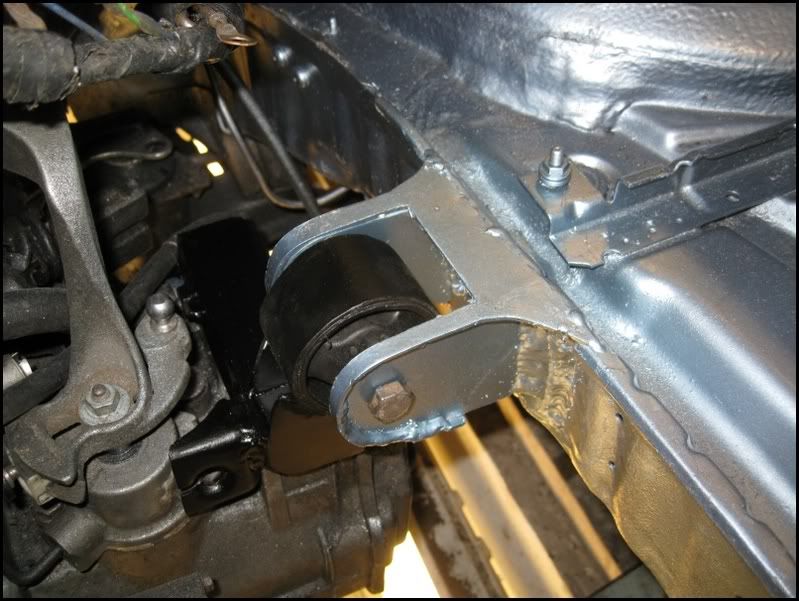
Hopefully this will help keep the engine from moving so much. [:y:]
This update is about the gearbox mount I made. I`ve read many posts on them and Steve_R kindly sent me a spare mount he had aquired.
Cut away the old bracket and was left with the bush and rubber mount
Camera battery died, so by the time it had recharged, I`d almost finished. I cut the clutch cable bracket, kept the part I needed to secure the Clutch cable, then welded that to my new bracket.
As I only have a Vice, Hammer, Angle Grinder and Welder, my fabricating skills may not be quite as good as they could be, however, after bending the plate 90 degrees, I realised I couldnt bend the next part, so I left it as a letter `L`, then welded on a flat piece to complete the `U` shape I was after.
As the rubber was in the sleeve, when welding the support arms to the sleeve, I welded a few seconds then dunked it all in a bucket to cool it and protect the rubber.
Welded some plate to the chassis leg
Then mounted the bracket on the gearbox to enable correct placing of the 2 plates to support the mount.
I then welded the 2 plates to the chassis leg
I was concerned the plates would flex side to side, so I cut some more plate and bent it.
This was then welded into plate to significantly strengthen the whole bracket
A few coats of matt black for the bracket
Here you can see the captive nut I welded on the back.
Paint the chassis leg mount
Then attach the whole thing together.
Hopefully this will help keep the engine from moving so much. [:y:]
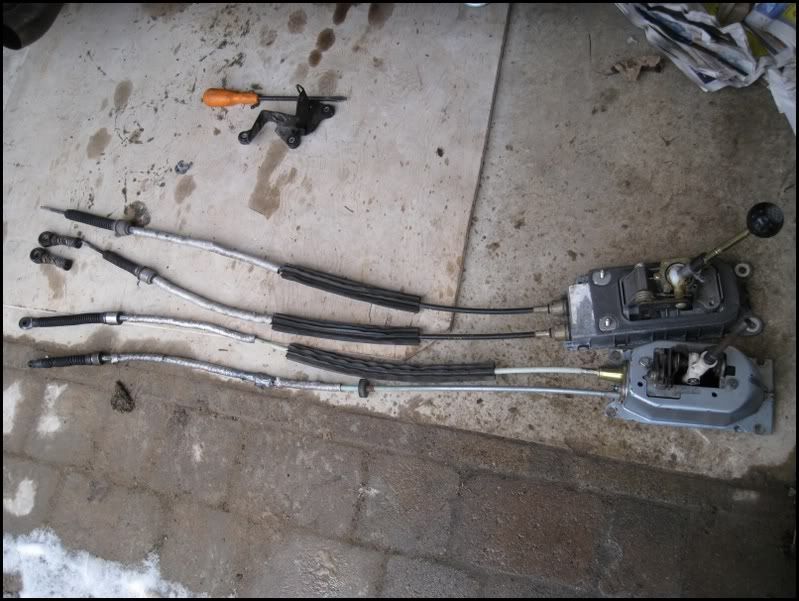
After my`moment` at Oulton and a general dissatisfaction with the vague cable change, I took a friends`s advice and went down the MK4 shifter route. I sourced a MK4 shifter tower and cables from the classifieds on ClubGTi. When I`d bought my low ratio gearbox, the seller had very kindly given me a MK4 tower he had no use for 
MK3 Shifter and cables and MK4 shifter and cables with `ball` ends.
First job fit MK4 tower. AH a problem already (but not unexpected, I`d already heard of this). The MK4 Shofter reversing switch fouls the cable clutch bracket.
Easy to fix, gring off the bracket.
That leaves a hole for debris to enter and drop into the gearbox. Deciding this was not a good thing, I screwed in a bolt a few threads (with Locktite applied). Be careful not to screw it in too far or it will foul the internal shifter and stop you engaging 5th gear. Not that I did that of course [;)]
Grind off the bolt head
Fit the tower into the gearbox [:y:]
The MK4 gear lever is not threaded, my gearknob is, so I needed to run a Die down the shaft. No problem you may think? hmmm, the shaft had a `kink` in it and believe me, that makes starting a die and absolute PAIN [:x]
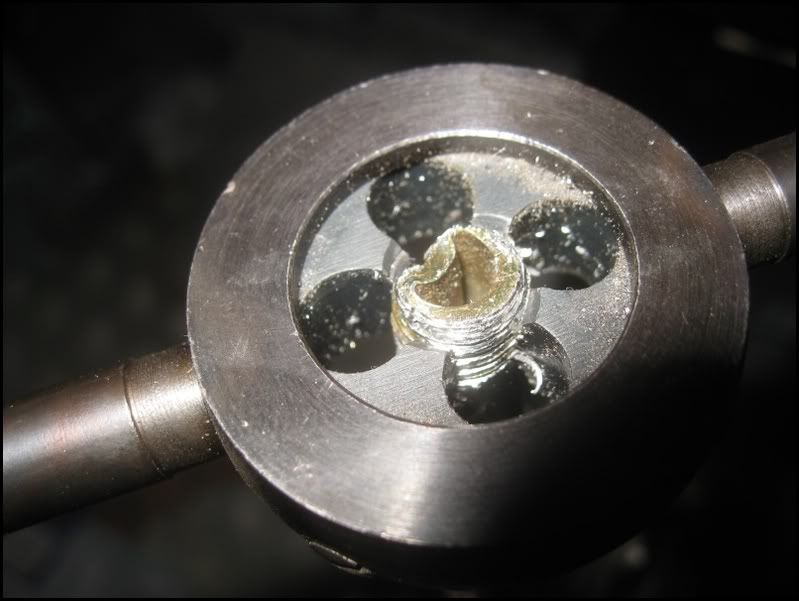
I needed to apply ALL my body weight to keep the die horizontal and force it to start a thread.
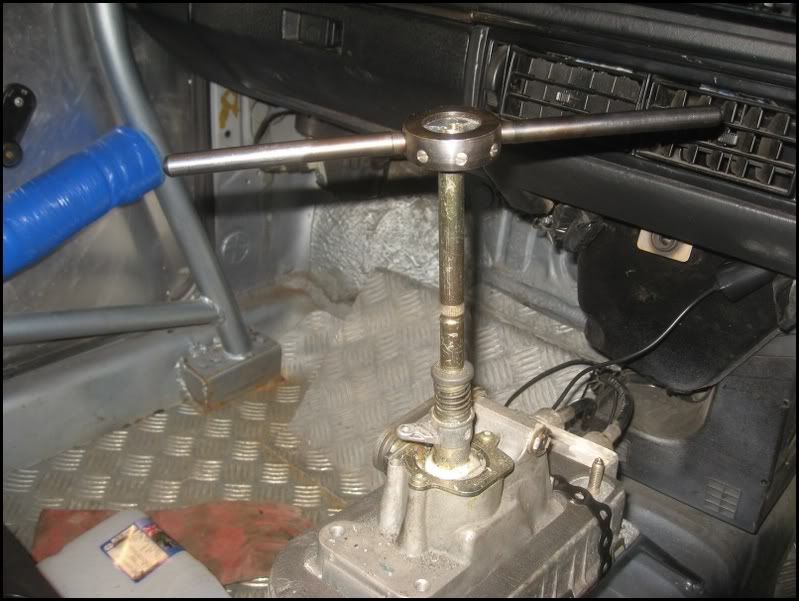
Once done, a nicely threaded gearshaft
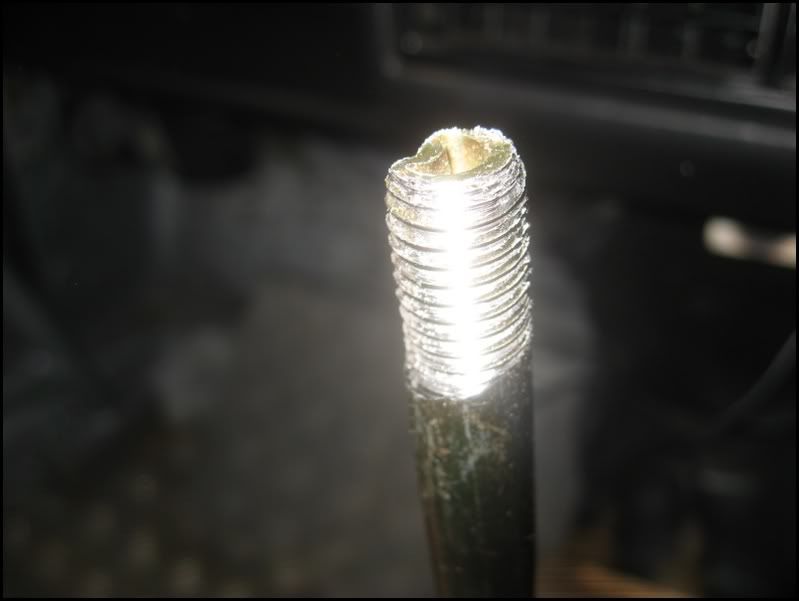
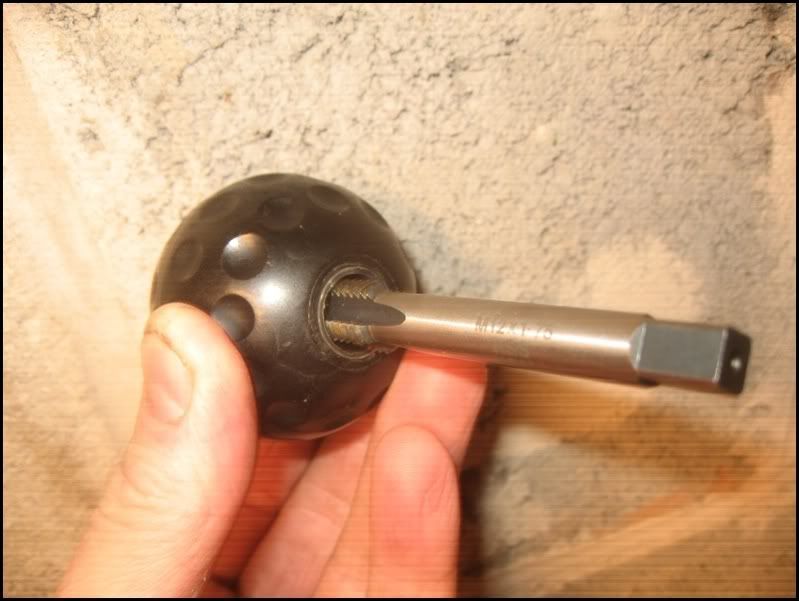
I ran a tap down the gearknob to clean out the threads as my die is M12 x 1.75 and I think the VW spec is M12 x 1.5.
The MK4 shifter is secured differently at the front, so I started to make a bracket out of 2mm plate, then decided that was OTT so used some banding I have in my toolbox, much easier, lighter and ready painted.
After wrapping a length around the shifter and frame, I secured the ends with a 6mm nut and bolt
One fixed MK4 Shifter with gearknob secured [:)]

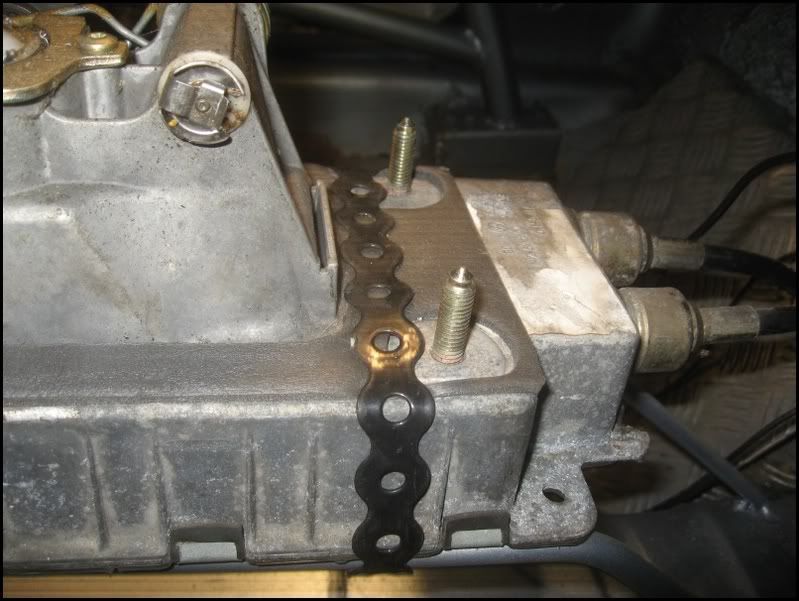
Cables attached on the gearbox.
I can report that the shifter IS much better that the MK3 setup. Still not as precise and the rod change in an 020 box, but definately an improvement over the MK3 setup. The shift is precise and weighty, nowhere near as vague as the other was.
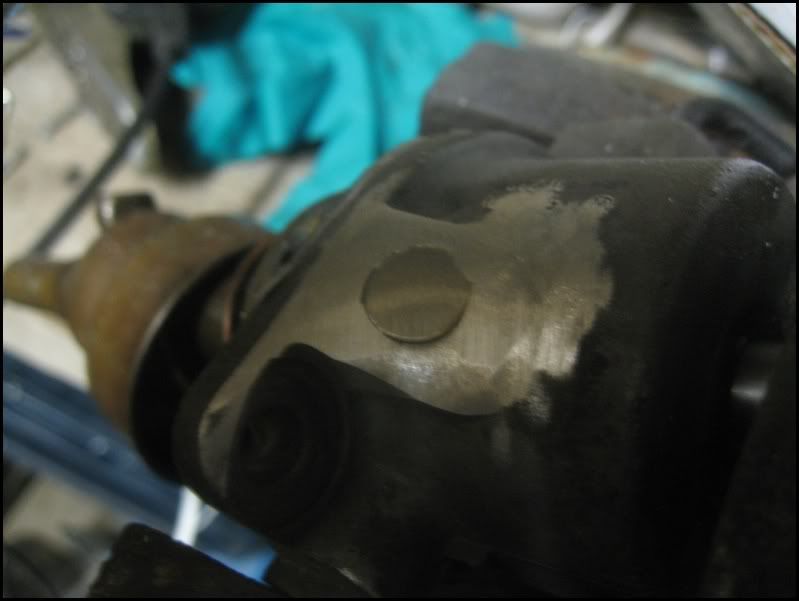
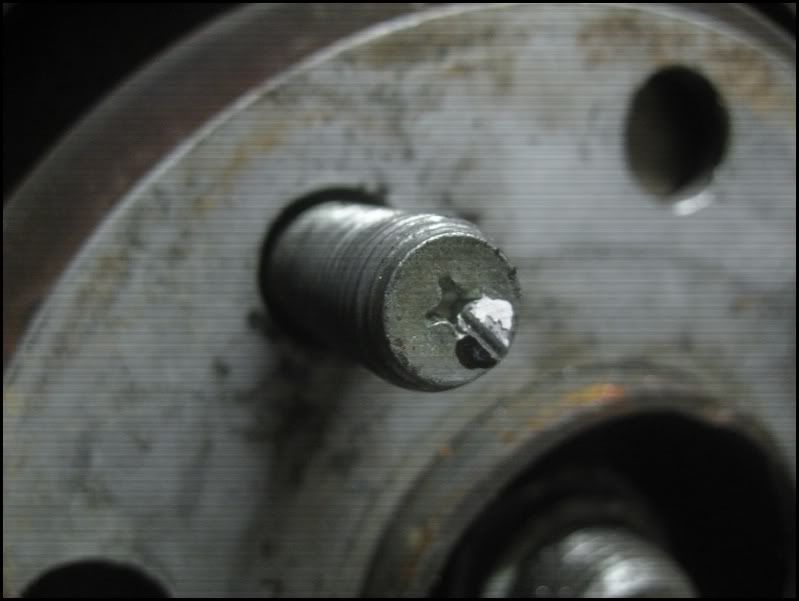
Aquired some studs for a conversion, threadlocked the studs and double-nutted them into the hubs/disks.
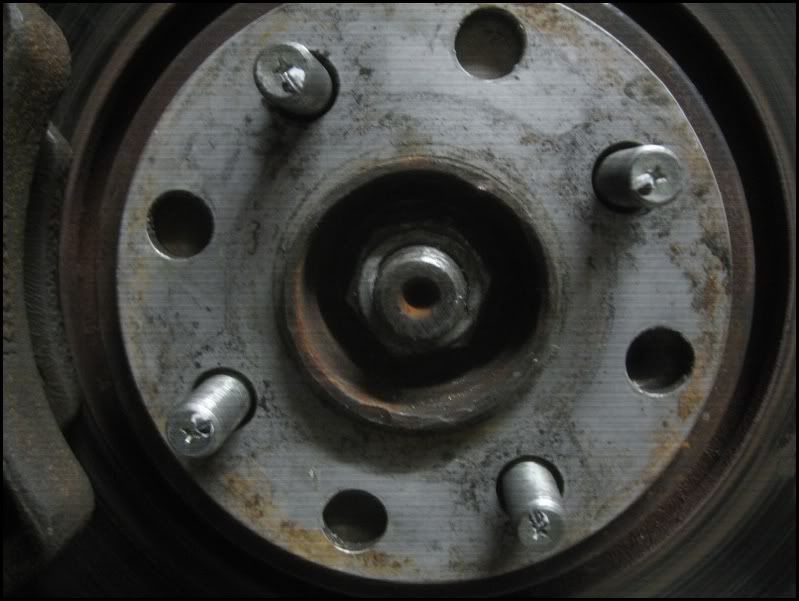
Once done, I applied a spot of tippex and then a tap with a chisel at the nearest point of the stud to the hub. Hopefully a quick glance when checking round will let me know if they are coming loose.
For those that have followed this thread, I`m afraid I`m going to be mentioning the one topic that keeps cropping up. My Exhaust [:x]
After securing the system, I`d drive locally or on UK trackdays and it would be fine, but once on the ring, the Karussel would destroy the exhaust rubbers in a few laps. I tried the rubbers with chains inside them, which helped, but that exhaust would still bang about on the underside of the car which simply wasn`t good enough. It caused me cracked downpipes, split exhaust welds and generally peed me off.
Found a bargain Magnex system on Ebay, like new and for a great price. The seller wouldn`t post, so I think that kept the number of bidders down. Fortunately for me, a mate lived about 6 minutes away and a plan was hatched for him to collect it and then courier it to me [:D]
System arrived and I decided that THIS TIME the damn thing would be right.
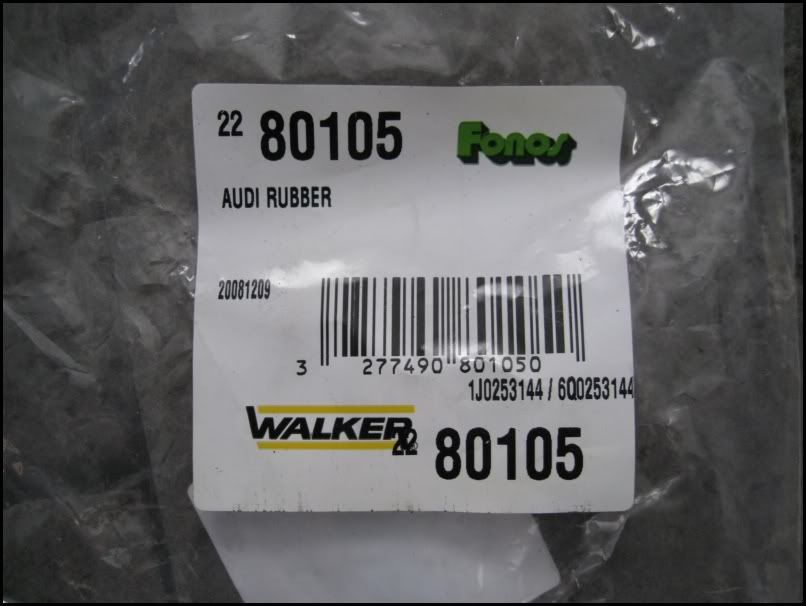
Job one was to aquire some heavy duty rubbers and after talking nicely to my local garage, I went to the exhaust trade only depot nearby and had a look on their shelves. Found this which looked perfect for me. A heavy rubber with built in bracket.
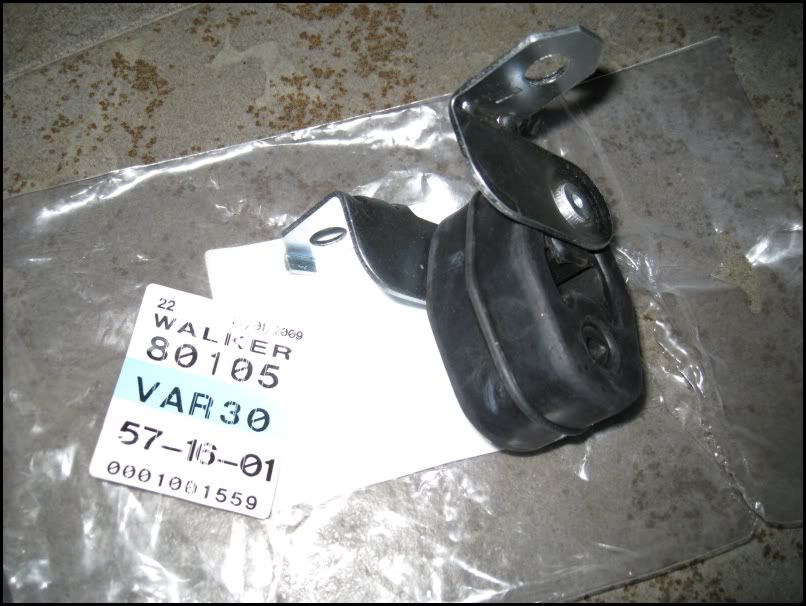
Here are the part numbers if anyone in interested.
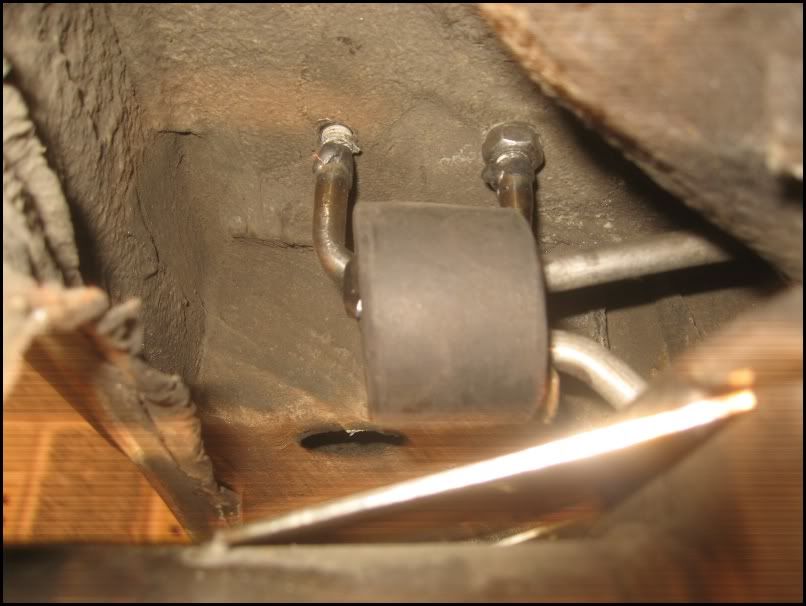
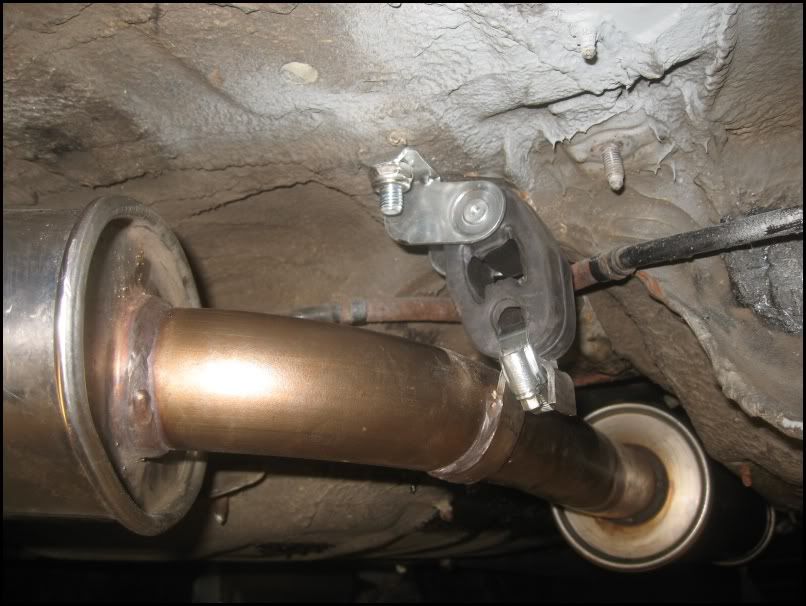
The system came with a large rear mount and bracket. I secured this to the side of the spare wheel well,but it still allowed movement. I welded some 10mm threaded bar to a length of bent 10mm stainless.
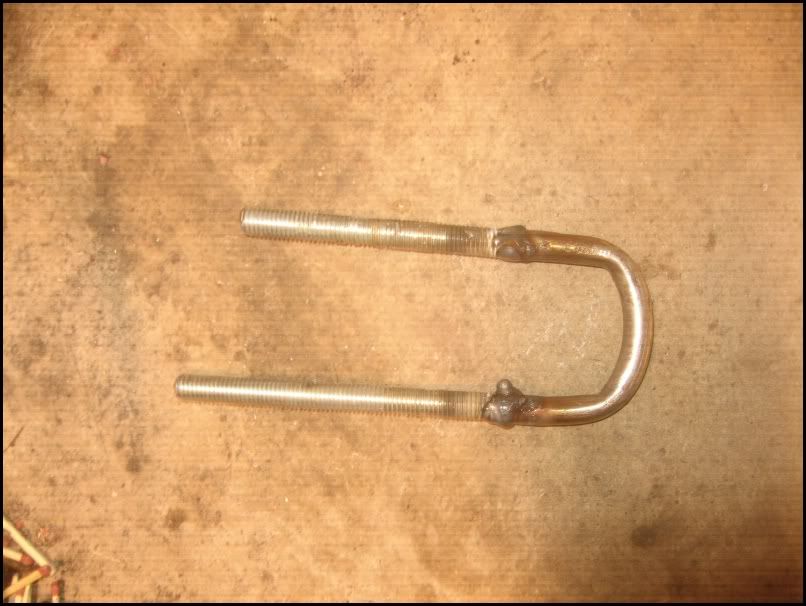
This `U` was threaded through the rubber, then through 2 holes I drilled in the floor of the boot. These were secured with locknuts (I had one on the UNDERSIDE so I could position it vertically). Obviously, all newly drilled holes were painted.
That should be the backbox secured, lets move forward. Using another heavy duty rubber, I decided to make this letter `L` from some plate and weld on a bolt
This was then fed through the rubber and afterwards a small locking `leg` welded on to stop it dropping off.
Fortunately, there was already a hole in the chassis, next to the original mount which I could bolt this though using a nyloc nut.
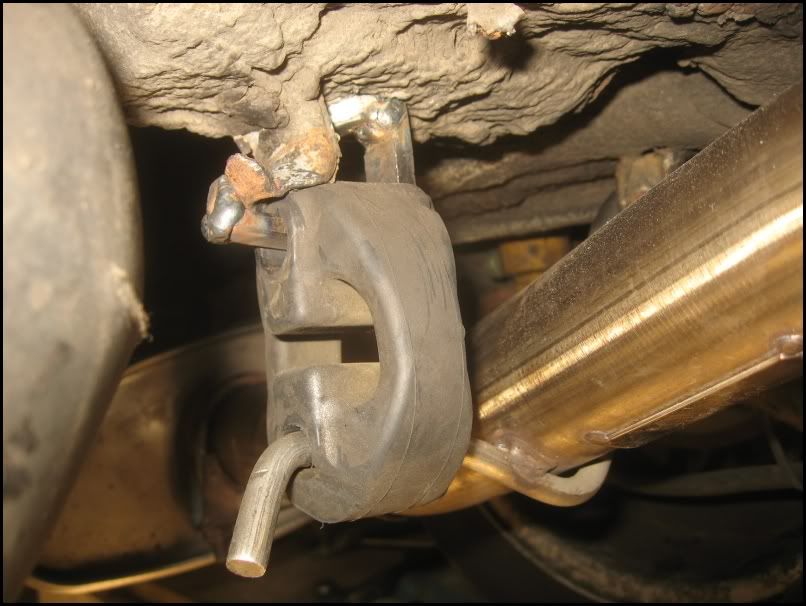
This positioned the bend over the rear beam perfectly.
Using my new bracket/rubber, I removed the standard `hook` mounting point and drilled a couple of holes and secured the new mount. Secured the Rubber to the exhaust using a jubilee clip. I didn`t want to start chopping / rewelding the new exhaust and this is very secure.
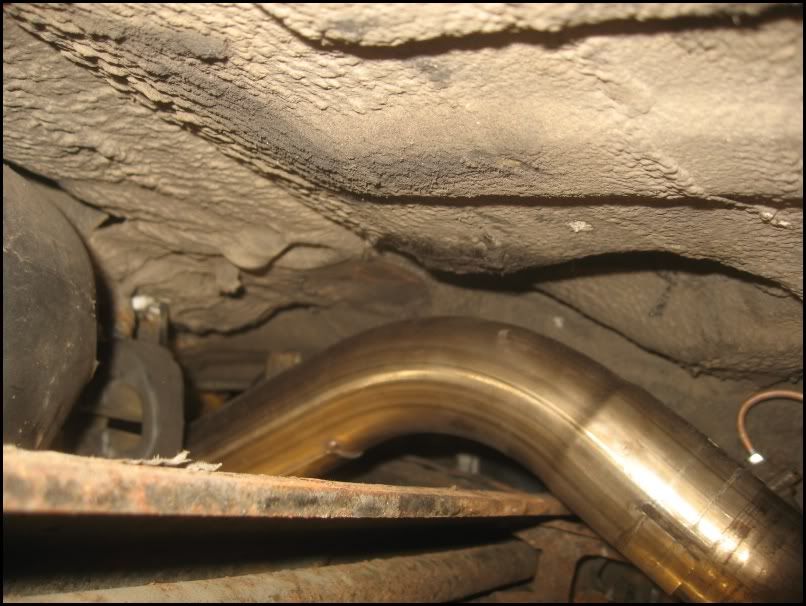
The system sits nicely in the centre of the tunnel, it IS able to move freely on the rubbers, but I hope, it is held in place securely enough to stay in place. The extra mount I added to the gearbox will hopefully limit the engine movement a little too.
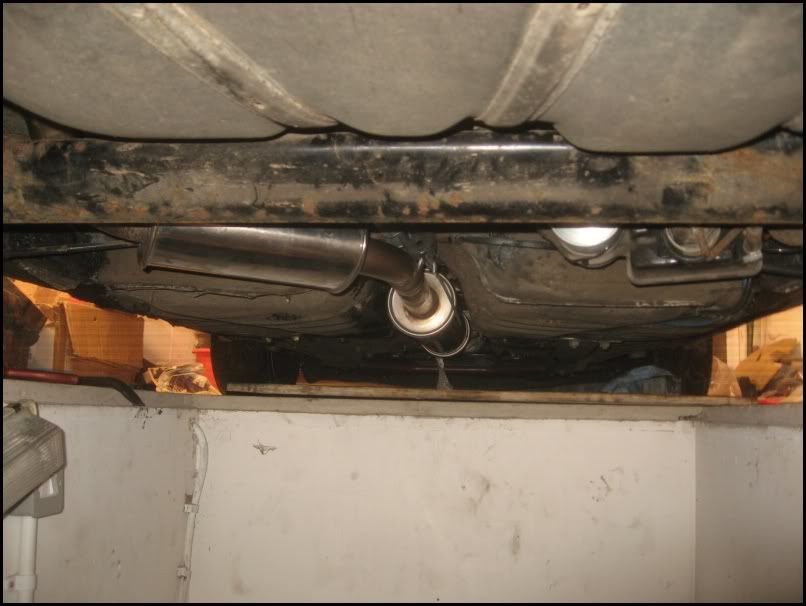
New backbox with smaller twin tailpipes
Will this be good enough? well, I`ll find out at the ring over Easter [LOL]
MK3 Shifter and cables and MK4 shifter and cables with `ball` ends.
First job fit MK4 tower. AH a problem already (but not unexpected, I`d already heard of this). The MK4 Shofter reversing switch fouls the cable clutch bracket.
Easy to fix, gring off the bracket.
That leaves a hole for debris to enter and drop into the gearbox. Deciding this was not a good thing, I screwed in a bolt a few threads (with Locktite applied). Be careful not to screw it in too far or it will foul the internal shifter and stop you engaging 5th gear. Not that I did that of course [;)]
Grind off the bolt head
Fit the tower into the gearbox [:y:]
The MK4 gear lever is not threaded, my gearknob is, so I needed to run a Die down the shaft. No problem you may think? hmmm, the shaft had a `kink` in it and believe me, that makes starting a die and absolute PAIN [:x]
I needed to apply ALL my body weight to keep the die horizontal and force it to start a thread.
Once done, a nicely threaded gearshaft
I ran a tap down the gearknob to clean out the threads as my die is M12 x 1.75 and I think the VW spec is M12 x 1.5.
The MK4 shifter is secured differently at the front, so I started to make a bracket out of 2mm plate, then decided that was OTT so used some banding I have in my toolbox, much easier, lighter and ready painted.
After wrapping a length around the shifter and frame, I secured the ends with a 6mm nut and bolt
One fixed MK4 Shifter with gearknob secured [:)]
Cables attached on the gearbox.
I can report that the shifter IS much better that the MK3 setup. Still not as precise and the rod change in an 020 box, but definately an improvement over the MK3 setup. The shift is precise and weighty, nowhere near as vague as the other was.
Aquired some studs for a conversion, threadlocked the studs and double-nutted them into the hubs/disks.
Once done, I applied a spot of tippex and then a tap with a chisel at the nearest point of the stud to the hub. Hopefully a quick glance when checking round will let me know if they are coming loose.
For those that have followed this thread, I`m afraid I`m going to be mentioning the one topic that keeps cropping up. My Exhaust [:x]
After securing the system, I`d drive locally or on UK trackdays and it would be fine, but once on the ring, the Karussel would destroy the exhaust rubbers in a few laps. I tried the rubbers with chains inside them, which helped, but that exhaust would still bang about on the underside of the car which simply wasn`t good enough. It caused me cracked downpipes, split exhaust welds and generally peed me off.
Found a bargain Magnex system on Ebay, like new and for a great price. The seller wouldn`t post, so I think that kept the number of bidders down. Fortunately for me, a mate lived about 6 minutes away and a plan was hatched for him to collect it and then courier it to me [:D]
System arrived and I decided that THIS TIME the damn thing would be right.
Job one was to aquire some heavy duty rubbers and after talking nicely to my local garage, I went to the exhaust trade only depot nearby and had a look on their shelves. Found this which looked perfect for me. A heavy rubber with built in bracket.
Here are the part numbers if anyone in interested.
The system came with a large rear mount and bracket. I secured this to the side of the spare wheel well,but it still allowed movement. I welded some 10mm threaded bar to a length of bent 10mm stainless.
This `U` was threaded through the rubber, then through 2 holes I drilled in the floor of the boot. These were secured with locknuts (I had one on the UNDERSIDE so I could position it vertically). Obviously, all newly drilled holes were painted.
That should be the backbox secured, lets move forward. Using another heavy duty rubber, I decided to make this letter `L` from some plate and weld on a bolt
This was then fed through the rubber and afterwards a small locking `leg` welded on to stop it dropping off.
Fortunately, there was already a hole in the chassis, next to the original mount which I could bolt this though using a nyloc nut.
This positioned the bend over the rear beam perfectly.
Using my new bracket/rubber, I removed the standard `hook` mounting point and drilled a couple of holes and secured the new mount. Secured the Rubber to the exhaust using a jubilee clip. I didn`t want to start chopping / rewelding the new exhaust and this is very secure.
The system sits nicely in the centre of the tunnel, it IS able to move freely on the rubbers, but I hope, it is held in place securely enough to stay in place. The extra mount I added to the gearbox will hopefully limit the engine movement a little too.
New backbox with smaller twin tailpipes
Will this be good enough? well, I`ll find out at the ring over Easter [LOL]
-
ginger ninja
- Posts: 409
- Joined: Sun Jan 27, 2008 3:31 pm
- Location: Norwich
- Contact: