Detailing FAQs

Professional Valeting Services
Post Reply
User avatar
Stuart
Posts: 18080
Joined: Thu Jul 27, 2006 3:26 pm
Location: Auto-Genie HQ
Contact:

Detailing FAQs

Post by Stuart »

Hi Guys

I've been asked to put something together for another forum, so figured it may be of interest here as well. Here's a bunch of frequently asked questions that I get asked (very) regularly about the work that I do, and what people should be doing or buying for their cars, so here goes. There is no particular order and if you have your own queries you can either add it here or send it to me via PM or email and I'll add it to this forum with a reply. Where possible I'll include the actual products that I use with links to where these can be bought :thumbs: (I may even look at group buys if there is sufficient interest)

Basics
What's the reason behind two bucket washes? The simple answer is using one bucket of shampoo and a separate rinse bucket drastically reduces the chances of putting any dirt, muck and grit that you've just shampooed off of the car, back on it and therefore causing damage to your own paint! The basic principles are as follows

Remove loose mud & dirt with water pressure first
Using a wash mitt and shampoo, lightly clean one panel at a time in straight lines checking very carefully for any dirt pick up
Rinse the mitt very regularly in your rinse bucket
Load the mitt up with shampoo and move to the next section of paint
Always use a separate mitt or brushes for wheels

I use these from Car-Chem along with one set of grit-guards in the rinse bucket
Image

Why do you use separate mitts, brushes and buckets for wheels? Brake dust can be abrasive so there's no way I would want to risk getting any of that on paint. If you must use the same bucket & water as you use for your paintwork, please, please clean your wheels after you have cleaned your paint, and thoroughly rinse everything afterwards.

Avoiding contamination caused by these two simple steps is one of the simplest ways of reducing wash induced paint damage.

Paint swirls and defects
I can see swirls in the paint so how do I get rid of these? There are three common methods of polishing paint; by hand, by machine and paying someone else! All three steps require you to remove protective clear coat or paint from the car, so go very carefully indeed. Polishing by hand can make a difference and I've proved that many times using nothing more complicated than a triple layer hand pad and some finishing compound. I'm not going to say it's easy work, and I'm not going to say the results will be as good as machine work but it can make a noticeable difference. I recommend the following techniques by hand;

Buy yourself some hand pads like these
Image
The pad has a very soft layer, central supportive core layer and then a firm layer which is ideal for polishing by hand.
Buy yourself some polishing compound like this, CarPro Fixer
Image
Ensure the panel that you want to polish is free of dust and dirt, and run the pad under a tap to make it damp (not soaking!!)
Apply two or three pea sized blobs of polish and gently spread this across the end of the pad on the firm side
Polishing in straight lines (back and forth motions) of no more than 12" square, keep polishing until the solution is starting to look clear as opposed to white
Buff off lightly with a clean microfibre and inspect your results (ideally using LED lighting)
If you're satisfied with your results at this stage, complete the same procedures one panel at a time for the whole car. If you're not satisfied then you'd better contact me and I'll be happy to help :thumbs:

Bird poo and bug splatter have stained my paint[i/] Both of these issues are really common and should be treated as soon as possible. Essentially, bugs and bird bombs are highly corrosive as they contain acids and alkalines that will etch your lacquer very quickly. Protection in the form of wax or sealants will help but even then you should always try to safely remove poo or splatter as soon as you can. I use warm water on a cotton make up pad, and leave it to sit on the affected area for a few minutes. This is usually enough to soften up whatever it is, so that you can gently remove the offending matter without scratching the paint (insect bodies are hard and scratchy, and birds often eat grit or seeds, so these can all mark paint; let alone the corrosive elements!)
If you do get etched paint from bird poo or bugs, it may be repairable by hand polishing so you could repeat the above steps.

Machine polishing, whether by any variant of DA or Rotary polisher is far more in depth and carries the added complication of paint damage. I don't mind sharing what I can but I feel it may be better to do that in either a separate thread or on a one to one basis, so if you're interested let me know.

Engine bay detailing
Image
I don't know how to clean my engine bay safely. How do you do it? I don't see the point in taking risks with engines and when you're trusted to work on cars like APT's Evo, custom Bel Air's and the fastest GTR in Europe those risks are sizeable. With that in mind always have a good look at what you're trying to clean and where it is. Is it muck and filth around the painted areas? If so tackle that one area at a time with some microfibres using warm water, all purpose cleaner and plenty of time. Soak the cloths in water and then ring them out before you put it on the area you want to clean. This will make far less mess, and ensure that potentially vulnerable electronics don't get soaked. I sometimes use steam to break down grease or dirt for the same reason. Plastics and rubbers can be gently cleaned with diluted all purpose cleaner or even plain car shampoo. Just make sure you rinse the plastics after you've cleaned them and you will be fine. Never, never use water near the coil packs or in fact any of the electronics without carefully masking them up first. If you're at all unsure ask. I accept no liabilities if you are stupid or complacent :D

Engine bay detailing takes time, so never rush it. Something like a stock Evo will take two to three hours to do properly, although I could make a sizeable visual difference in an hour; maybe less. Great, recommended products are;
Britemax twins for metal polishing and protection
Image
Aerospace 303 for plastic and rubber hoses
Image
Britemax AIO for one step polishing & protection of paintwork
Image
For all purpose cleaner and degreasing duties, either use a dedicated retail product like Meguiars or buy a trade one but make sure you dilute it down to 30:1 with water (30 parts water to 1 part of cleaner)

Hopefully that's useful for now. I'll add some more later on :) If you have any doubts or questions at all, please ask. I accept no liability at all for anyone causing damage to property :seeya:
http://www.auto-genie.co.uk
07733 527430
stuart@auto-genie.co.uk
Valeting, detailing and undersealing

Ian200sx
Posts: 464
Joined: Sun Oct 22, 2006 1:09 pm

Re: Detailing FAQs

Post by Ian200sx »

Great read, any top tips for fabric seats? I get better results with a wet vac but don't like how wet the seats get. Also in your trade do you happen to know of any good dent devil type people? Cheers

User avatar
Stuart
Posts: 18080
Joined: Thu Jul 27, 2006 3:26 pm
Location: Auto-Genie HQ
Contact:

Re: Detailing FAQs

Post by Stuart »

Thanks Ian :)

Cleaning fabric seats can be tricky and you are right to be concerned about getting interiors overly wet, but here is a basic overview of how I'd tackle it and what products & equipment I use

Firstly I would use these for loose muck for step one (no sense in making loose dirt wet and sticky with step two)
Image
Image
With the seats (or carpets) free from loose debris, sweet wrappers etc assess where the staining is first (isolated or general?). If you have LED lighting you'll make your life a lot easier as interior lights just don't cut the mustard. I insist on LEDs for interior work as they don't generate heat and therefore won't damage fabrics if they accidentally fall over. I use these ones which are cheap (sub £30) and rechargeable for convenience.
Image
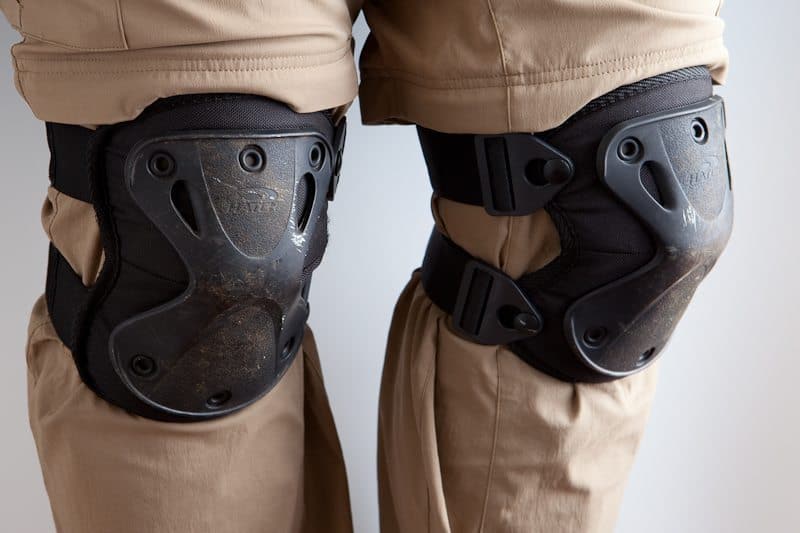
Once you've assessed where the stains are, get yourself some microfibres, some dedicated interior fabric cleaner and a knee pad......you'll need them.
£25 from Screwfix
Image
£10 from ioclean.co.uk
Image
You'll thank me later :)
Image

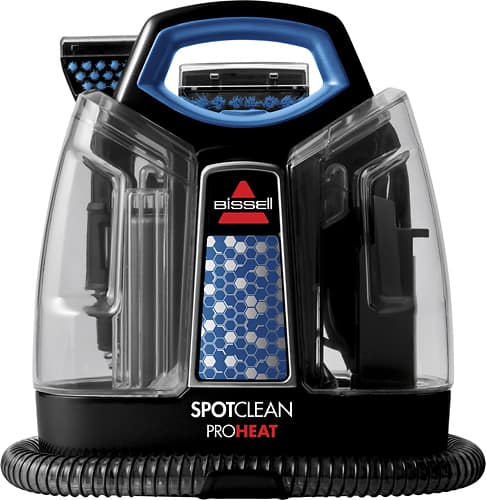
Spray the fabric cleaner on to the fabric stain and allow it to sit for a while (1 minute plus). Using a damp microfibre folded in fours, use one corner and twist the microfibre against the stained area in a dabbing style. This twist and dab motion is much more effective than scrubbing, as you stand less chance of driving the stain further into the fibres of the fabric. Inspect your work as you may need to repeat this a few times. Once you're satisfied that you've removed the stain you should wipe the entire seat/ fabric surface with another microfibre cloth that's been sprayed with the same cleaning solution. This will reduce the chances of spots on your seats where some bits have been deep cleaned, and some have had nothing at all. If you have an extraction machine, now is the time to use it. After lots of testing I use this one, with excellent results
Image
This will not only flush through any cleaning products used but it will also restore a far more uniform look to your fabrics. I only use the rinse function with hot water so this way I can be confident that the seats will only be damp at worst, as opposed to leaving remnants of chemical in there (safer for the fabric and safer for kids who may use the car too)
The last step is to check the seats/fabrics for damp and dry them with this if necessary
Image
Using this badboy, I have adjustable wind speed and temperature so I can ensure that surfaces are bone dry before handover. I understand that not everyone will want to spend the money on these bits of equipment so you may need to adapt how you improvise according to your own circumstances. Some other guys in the trade use the car's own heating system to help dry things out.

To future proof things Ian, I recommend that clients treat their carpets and seats with a fabric guard type product. These will make it far easier to clean things, as the sticky sweets, drinks and whatever else won't stick so easily to the fibres in the fabric :thumbs: Something like this?
Image

As for Dent Devils, I can recommend Mike who is the local one (to you). Call him on 077401 561400. I've seen his work first hand and he is very good, achieving excellent results on a client's noticeably dented Vauxhall Tigra as an example.
http://www.auto-genie.co.uk
07733 527430
stuart@auto-genie.co.uk
Valeting, detailing and undersealing

User avatar
Stuart
Posts: 18080
Joined: Thu Jul 27, 2006 3:26 pm
Location: Auto-Genie HQ
Contact:

Re: Detailing FAQs

Post by Stuart »

Another really common thing I get asked for advice on is cleaning alloys. For many of us, our alloys either make or break the appearance of the car so I guess it's natural that how they look can directly affect how we feel about our car. This sub-topic is pretty in-depth so I'll try to illustrate things as best as I can. These are the edited highlights :)

Take one filthy alloy wheel
Image
Step one>>Assess what you can see. The first thing to realise with this alloy is that is is covered in several different types of filth, and therefore may require several different techniques and products to get them truly clean. It it just brake dust you're trying to remove or is there tar as well? Do old wheel weight adhesive pads also need to be removed? Is any of the alloy affected by kerbing, paint failure or alloy oxidisation? Any paint damage at all needs to be treated very carefully and may well compromise the quality of your results so go careful. The last thing to take into careful consideration is the materials that you're about to start working on so check what the wheel is made of, and how it's finished and then also check the brake disc material too. I would hope that you know if your Bentley Continental Supersports has a 28k carbon ceramic brake option so if you try and clean those puppies with normal wheel cleaner, don't come crying to me :D

Step two>> Always, always rinse them off first. Not only does this potentially save you money through less wasted cleaning products but it will also take out any remaining heat out of of your wheels and brakes (Hot alloys + Alkaline or acids=trouble). With the loose muck off of your wheels, you can establish what kind of dirt you need to clean off (check and double check) Most alloys will have brake dust on them, some loose and some etched into the alloy.

Step three.. Assemble your dedicated wash bucket, mitt and brushes. You'll also need your kneepads again and access to running water. I have the following things to help me do a great job on wheels
For arches (may as well do these as you're down there anyway)
Image
For the delicate front faces
Image
For the inner wheel barrel I use these two
Image
and these
Image
For things like split rim bolts I use tooth picks and cotton buds
I also use a microfibre wash mitt to clean the wider areas of wheel once the worst of the dirt is of

Now it's time for the chemicals and cleaning products. Loose brake dust can usually be cleaned off with regular car shampoo, but if you need something a bit more robust Angelwax Bilberry is a good cleaner that is safe on all wheel types (including polished alloy and chrome)
Image
If the wheels have embedded brake dust (also known as iron contamination) then you'll need to grab something containing acid to remove it. This should only be used as and when you really need to, as it is more likely to cause problems with your alloys. I recommend these products, and they give you the infamous purple bleeding results that some people rave about (me included)
http://car-chem.com/store/de-ironiser-w ... aner-500ml
Image
Colour changing fallout removers work because they contain oxalic acid which reacts with iron particles and dissolves them, making them soluble and easier to remove.
This needs to be rinsed very thoroughly, and if any embedded iron isn't removed you can either repeat the application, allowing it to dwell for a few minutes (don't let it dry on) before rinsing again. If this doesn't work there are stronger acid cleaners (Autosmart Alishine for one) but these are quite literally lethal if you are not very careful. Another safer option to try is claying the wheels but I'll cover claying in another post sometime.

Step four>>
So with the alloy free of brake dust it's now time to tackle another regular problem with alloys, and that's tar & glue. Virtually all tar & glue issues can be solved with a decent solvent type product. I use a trade product but there are several good retail ones out there. It's as much about technique as anything else.

The Impreza alloy has tar spots and wheel weight adhesive everywhere, and in this shot you can see the spots being dissolved one by one. This needs to be gently wiped over with a microfibre and then rinsed thoroughly. Wheel weights need a different approach. Here I used cotton make up pads and soaked them in tar remover, then stuck them onto the wheel weight tape. After 5 minutes, they were ready to wipe off and rinse
Image
All tar & wheel weights safely removed
Image

Finished>> Stand back and admire the results of what could easily be a few hours work :) Brake dust gone, tar removed and even the inner wheel barrel restored to a thing of beauty.
Image
Image
Image
Image

Adding a touch of tyre dressing is always a matter of personal preference. if you are going to do this, please make sure that you clean they tyre properly first and then dry it off too, before applying the dressing and never use too much either. Tyre dressing sling is a killer!!
http://www.auto-genie.co.uk
07733 527430
stuart@auto-genie.co.uk
Valeting, detailing and undersealing

User avatar
pablo
Posts: 4896
Joined: Thu Nov 09, 2006 10:37 pm

Re: Detailing FAQs

Post by pablo »

Can you recommend a product for alloy wheels to protect them against brake dust. After a lot of discussion we will be having our alloys powder coated and i would like to keep them looking like new.
Tntracing
http://www.facebook.com/Tntracing.uk

2015 - MSA Classic & Retro UK Time Attack Champions

User avatar
Stuart
Posts: 18080
Joined: Thu Jul 27, 2006 3:26 pm
Location: Auto-Genie HQ
Contact:

Re: Detailing FAQs

Post by Stuart »

I use a number of products but favour these two
http://www.ioclean.co.uk/carpro-dlux-wh ... t-kit.html
A silica based coating that lasts for up to 12 months. Not the easiest to use compared to the paste sealant below as the preparation needs to be far more thorough. The bottle will do up to three sets
http://www.seriousperformance.co.uk/Pro ... w_934.html
Super, super tough, easy to apply & buff too. Simply amazing value for money as you can use it on paintwork. Enough here to do several cars for about two years!!!

Hope that helps :)
http://www.auto-genie.co.uk
07733 527430
stuart@auto-genie.co.uk
Valeting, detailing and undersealing

User avatar
pablo
Posts: 4896
Joined: Thu Nov 09, 2006 10:37 pm

Re: Detailing FAQs

Post by pablo »

Is this something that can be bought from you or should i just go straight to the company?
Tntracing
http://www.facebook.com/Tntracing.uk

2015 - MSA Classic & Retro UK Time Attack Champions

User avatar
Stuart
Posts: 18080
Joined: Thu Jul 27, 2006 3:26 pm
Location: Auto-Genie HQ
Contact:

Re: Detailing FAQs

Post by Stuart »

These are the two suppliers that I use for the products, so please go direct as it will be better value for you. By all means say I recommended the product and supplier when you call :D
http://www.auto-genie.co.uk
07733 527430
stuart@auto-genie.co.uk
Valeting, detailing and undersealing

User avatar
pablo
Posts: 4896
Joined: Thu Nov 09, 2006 10:37 pm

Re: Detailing FAQs

Post by pablo »

Thanks for your help Stu :)
Tntracing
http://www.facebook.com/Tntracing.uk

2015 - MSA Classic & Retro UK Time Attack Champions

Post Reply